Royal Navy light armoured cruisers: HMS Weymouth, HMS Dartmouth, HMS Falmouth, HMS Yarmouth, HMS Chatham, HMS Dublin, HMS Southampton, HMAS Brisbane, HMAS Melbourne, HMAS Sydney
The light armoured cruiser – light cruiser – succeeded the protected cruiser; improvements in machinery and armour rendering the latter obsolete. The Town class of 1910 were rated as second-class protected cruisers, but were effectively light armoured cruisers with mixed coal and oil firing. The Arethusa class of 1913 were the first oil-only fired class. This meant that the arrangement of coal bunkers in the hull could no longer be relied upon as protection and the adoption of destroyer-type machinery resulted in a higher speed. This makes the Arethusas the first “true example” of the warship that came to be recognised as the light cruiser. In the London Naval Treaty of 1930, light cruisers were officially defined as cruisers having guns of 6.1 inches (155 mm) calibre or less, with a displacement not exceeding 10,000 tons. (Wikipedia)
Weymouth group 5,250 tons, eight 6-in guns. HMS Weymouth, HMS Dartmouth, HMS Falmouth, HMS Yarmouth
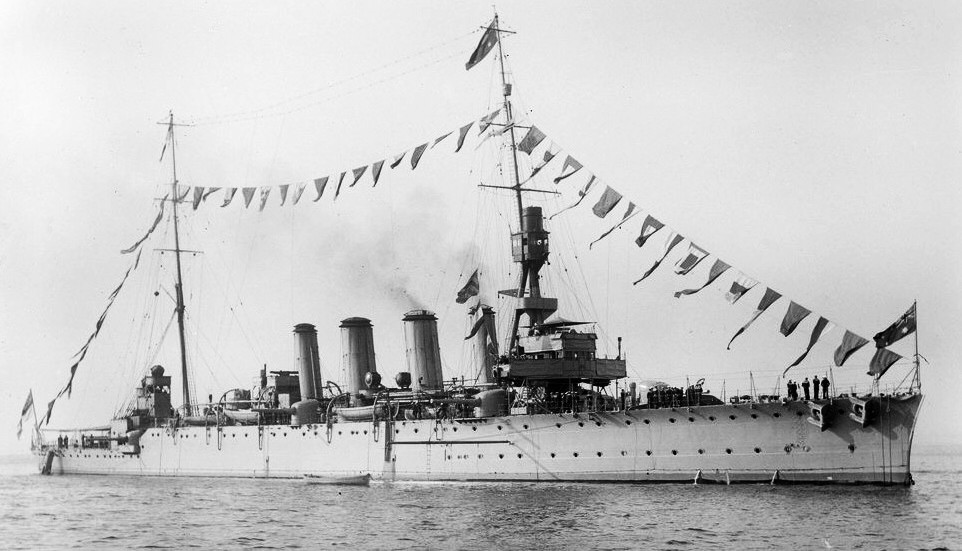
HMS Weymouth
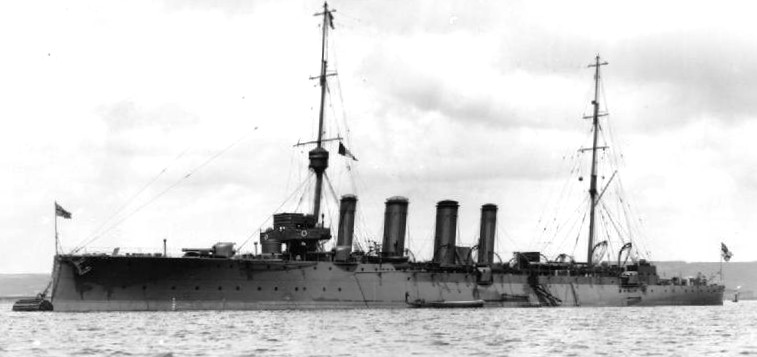
(IWM Photo, Q 21950)
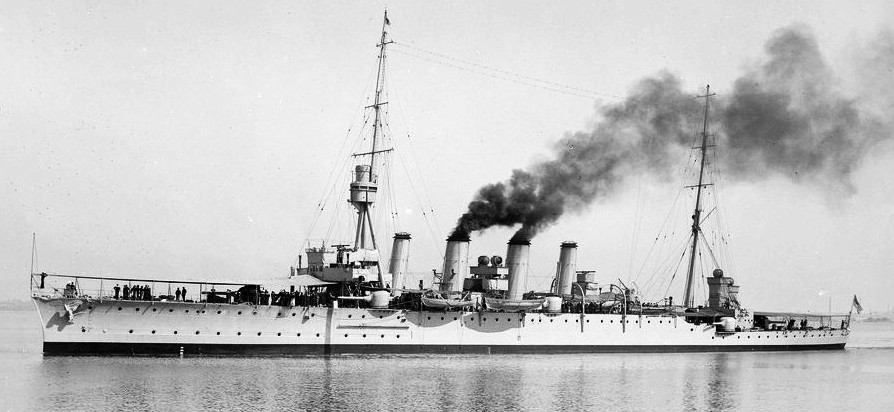
HMS Weymouth was a Town-class light cruiser built for the Royal Navy during the 1910s. She was the name ship of the Weymouth sub-class of the Town class. The ship survived the First World War and was sold for scrap in 1928. The ship was laid down on 19 January 1910 by Armstrong Whitworth at their Elswick shipyard and launched on 18 November. Upon completion in October 1911, Weymouth was assigned to the 3rd Battle Squadron of the Atlantic Fleet and was transferred to the 2nd Light Cruiser Squadron in the Mediterranean in June 1913. In August 1914, Weymouth was detached to sail into the Indian Ocean to hunt for the German light cruiser SMS Emden, which was raiding Allied shipping in the area. In February 1915, she was operating off the East African coast as part of operations against another commerce raider, SMS Königsberg, eventually trapping her in the Rufiji River until she could be sunk.
HMS Weymouth was transferred to the Adriatic in December 1915. In 1916 she returned to home waters and was assigned to the 6th Light Cruiser Squadron of the Grand Fleet. In 1917 she was reassigned to the Mediterranean as part of the 8th Cruiser Squadron operating out of Brindisi. She was damaged by a torpedo from the Austro-Hungarian submarine SM U-31 on 2 October 1918. She was repaired and survived the war. She was sold on 2 October 1928 to Hughes Bolckow, of Blyth. (Wikipedia)
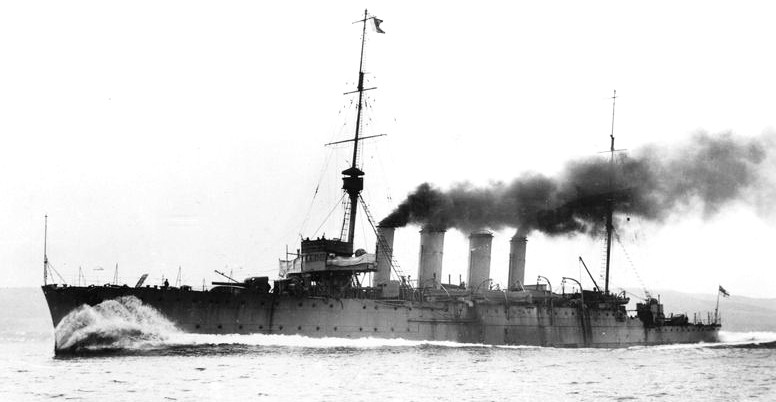
HMS Dartmouth
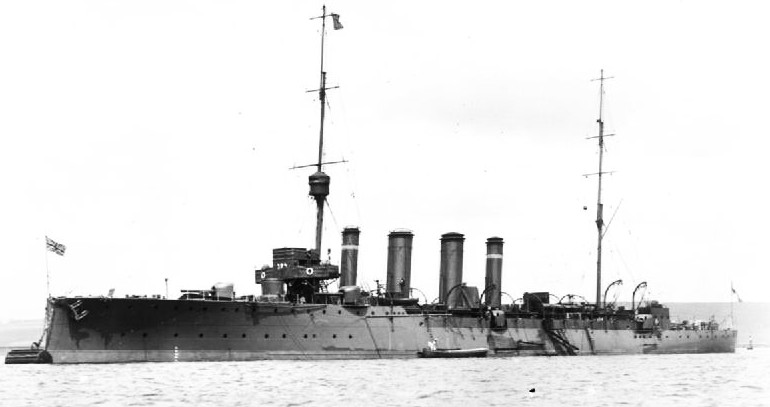
(IWM Photo, Q 38610)
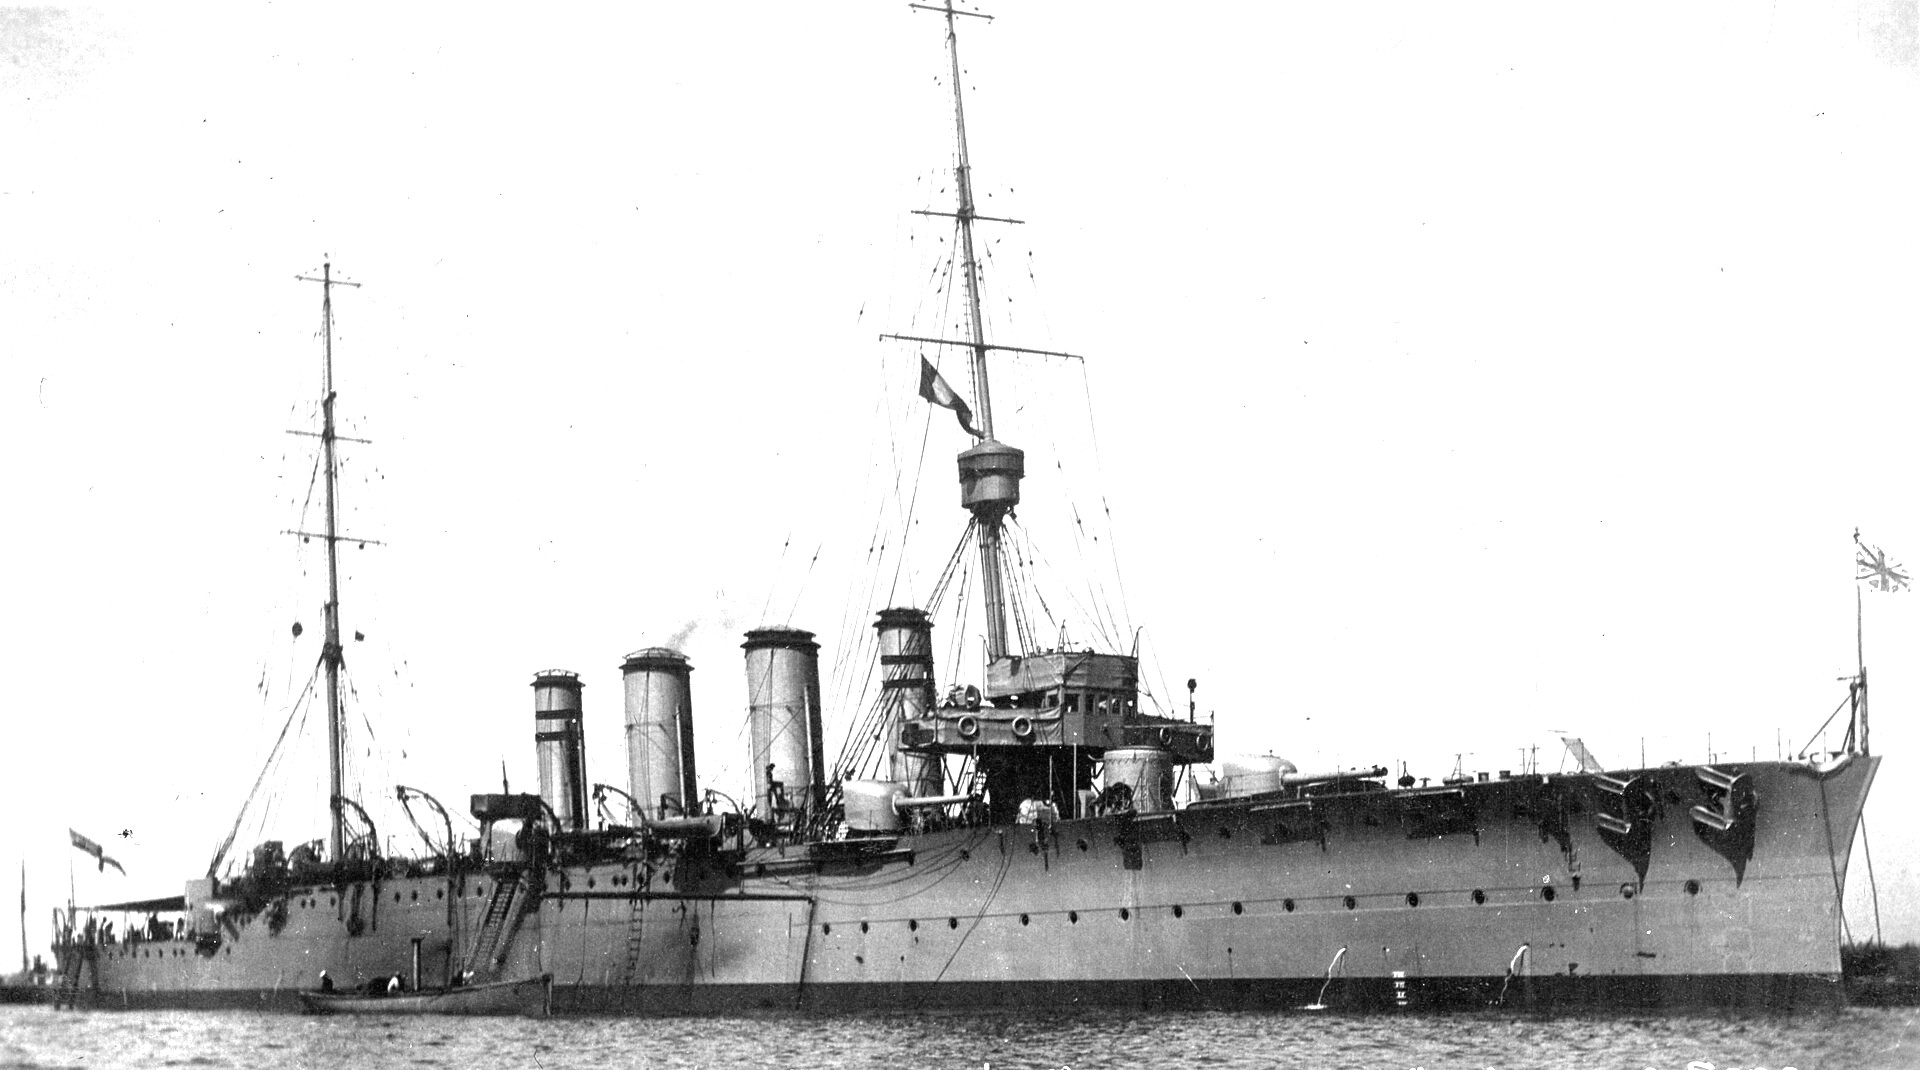
HMS Dartmouth was a Town-class light cruiser built for the Royal Navy in the 1910s. She was one of the Weymouth sub-class of the Town class. The ship survived the First World War and was sold for scrap on 13 December 1930. On commissioning, Dartmouth joined the Atlantic Fleet, being attached to the Third Battle Squadron from 1912 to 1913. After a 1913 cruise to the Mediterranean Sea, she was briefly attached to the Second Light Cruiser Squadron at Devonport to participate in the 1913 Naval Manoeuvres before leaving to join the East Indies Squadron of the Eastern Fleet.
On the outbreak of the First World War, Dartmouth was docked at Bombay, but was soon returned to sea, escorting a troop convoy from Karachi to Mombasa in Kenya and then taking part in the search for the German cruiser Königsberg. On 9 October that year she captured the German tug Adjutant in the Mozambique Channel.[1][14] On 30 October, the cruiser HMS Chatham spotted Königsberg moored up the Rufiji delta, and on 2 November, Dartmouth attempted to engage Königsberg or the supporting steamer Somali but the German ships were too far upstream to be successfully engaged. On 10 November, the British scuttled the collier Newbridge in the Rufiji River as a blockship to prevent Königsberg from escaping, and on 11 November, Dartmouth left to reinforce the Cape of Good Hope Station in the aftermath of the Battle of Coronel. In January 1915, Dartmouth was reassigned to the 2nd Light Cruiser Squadron of the Grand Fleet but was detached to operate in the South Atlantic in the search for the commerce raider SMS Karlsruhe. (Unknown to the Royal Navy, Karlsruhe had already been lost, sunk by an internal explosion on 4 November 1914 near Barbados.)
In February 1915, Dartmouth was sent to join the forces operating off the Dardanelles in support of the Gallipoli Campaign.[1][18] On 15 March she suffered a boiler explosion that killed 15 of her crew.[20][21] Despite this damage, Dartmouth continued operations, and on 18 March Dartmouth patrolled off the West coast of the Gallipoli peninsula while a final attempt was made by the battleships of the fleet to force the straits during daylight. The attack was a failure, with three battleships sunk by mines, and several more ships heavily damages by mines or by Turkish gunfire. Dartmouth escorted the battlecruiser HMS Inflexible, badly damaged by striking a mine, to Tenedos. On 25 April, the Allies landed troops at Anzac Cove and Cape Helles on the Gallipoli peninsula, with Dartmouth taking part in a diversionary simulated landing further north, at Bulair.
In May 1915, Dartmouth was reassigned to the 8th Light Cruiser Squadron at Brindisi, supporting Italian forces in the Adriatic Sea.[1][24] Dartmouth’s speed had been reduced to 21 knots (39 km/h; 24 mph) by the boiler explosion in March, and further boiler problems had reduced her speed to 16 knots (30 km/h; 18 mph) by June 1915.[26] As a result, on 30 June Dartmouth paid off at Malta for a refit, not recommissioning until 1 October. On 28 December 1915, an Austrian force of cruisers and destroyers raided the port of Durazzo in Albania, and Dartmouth, together with the Italian cruiser Quarto and several French destroyers, set off to intercept the returning Austrian force, later being joined by Dartmouth’s sister ship Weymouth and the Italian cruiser Nino Bixio. In the resulting Battle off Durazzo, Dartmouth scored several hits on the Austrian cruiser SMS Helgoland.
On 14/15 May 1917, Dartmouth took part in the Battle of the Otranto Straits. A force of three Austro-Hungarian cruisers (Helgoland, Novara and Saida carried out an attack on the drifters of the Otranto Barrage, while two destroyers Csepel and Warasdiner carried out a diversionary attack against merchant shipping off Albania.[29] The two destroyers attacked an Italian convoy at about 03:30 Central European Time (CET), sinking the Italian destroyer Borea and the freighter Carrocio, with the main cruiser attack on the drifter line starting at about 04:20 CET, with 14 of the lightly armed drifters sunk and four more damaged. Dartmouth, with the Italian Admiral Alfredo Acton, the overall commander of the Allied naval response aboard, left Brindisi at 05:36 CET in company with the Italian destroyers Simone Schiaffino and Giovanni Acerbi, and was joined in the pursuit of the Austro-Hungarian cruisers by the Italian scout Aquila and the British cruiser Bristol. Dartmouth was hit several times by shellfire from Austro-Hungarian cruisers which she was pursuing, and had to heave to. Returning to port she was hit by a torpedo from the German submarine UC-25 and began sinking. The order to abandon ship was given but a small team volunteered to remain on board manning the pumps while the Dartmouth was towed to port.
Dartmouth was drydocked and repaired and went on to survive the war, following which she was assigned to the America and West Indies Station, based at the Royal Naval Dockyard, on Ireland Island in the Imperial fortress colony of Bermuda, where she was damaged by a hurricane in 1922, while simultaneously fighting a fire. She was sold for scrapping on 13 December 1930 to Alloa Ship Breaking Company of Rosyth. (Wikipedia)
HMS Falmouth
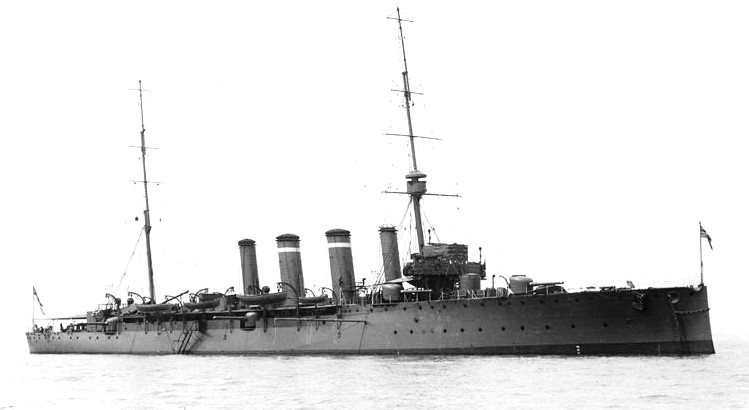
(IWM Phot, Q 75354)
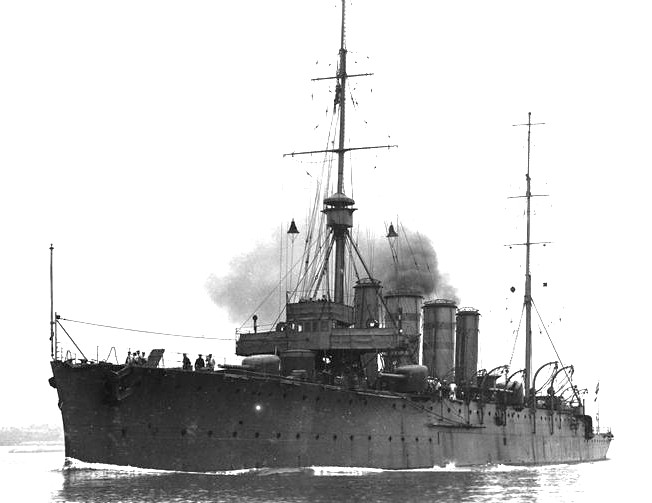
HMS Falmouth was a Town-class light cruiser built for the Royal Navy during the 1910s. She was one of four ships of the Weymouth sub-class. The ship was initially assigned to the Atlantic Fleet upon completion in 1911, but was reduced to reserve in mid-1913. When the First World War began in 1914, Falmouth was transferred to the 1st Light Cruiser Squadron (LCS) of the Grand Fleet and then the 3rd Light Cruiser Squadron at the end of the year. The ship participated in most of the early fleet actions, including the Battles of Heligoland Bight, Dogger Bank, and Jutland, but was only seriously engaged in the latter. She was torpedoed and sunk off Flamborough Head, Yorkshire by German submarines during the action of 19 August 1916. (Wikipedia)
Battle of Jutland
HMS Falmouth participated in the Battle of Jutland on 31 May–1 June 1916. As the battle began, the 3rd LCS was screening Beatty’s battlecruisers as they searched for the German fleet and moved to support the 1st LCS after they had spotted the German ships. This put them out of position when Beatty turned south to pursue the German battlecruisers. After he turned north on encountering the main body of the German High Seas Fleet, Falmouth and her squadron were the first to encounter the screen of the Grand Fleet at 17:33. As Beatty turned east to rendezvous with them, the cruiser engaged several German ships at ranges below 7,000 yards (6,400 m) and in poor visibility. Falmouth opened fire on the disabled light cruiser SMS Wiesbaden beginning at about 18:15 and also fired a torpedo at her that missed around 18:21. She then briefly engaged two destroyers and then switched to the battlecruisers SMS Lützow and SMS Derfflinger, hitting both ships, also firing a torpedo that she mistakenly claimed to have hit around 18:25. In return, the ship was only hit once by a 15-centimetre (5.9 in) shell on the foremast that cut the voice tubes to the spotting top. By 18:40, the squadron was in position to escort the 3rd Battlecruiser Squadron of the Grand Fleet.
By 20:10, Beatty’s ships were in front of the Grand Fleet and the 3rd LCS was screening them when Falmouth spotted five cruisers of the 4th Scouting Group and the squadron closed to engage at full speed. The British ships were not spotted in return until 20:17 and Falmouth opened fire a minute later at a range of 9,600 yards (8,800 m). Despite poor visibility, she hit the light cruiser SMS München twice, one of which damaged her aft boilers and impaired her ability to keep steam up. By 20:38, the British lost sight of the Germans and turned away to assume their position at the head of Beatty’s battlecruisers. The cruiser fired a total of 175 shells during the battle, the most of any British light cruiser.
Action of 19 August 1916
On the evening of 18 August, the Grand Fleet put to sea in response to a message deciphered by Room 40 that indicated that the High Seas Fleet would be leaving harbour that night. The German objective was to bombard Sunderland the following day, based on extensive reconnaissance conducted by Zeppelins and submarines. Part of the German plan was to draw the British ships through a series of submarine ambushes and Falmouth fell victim to one of the awaiting U-boats, U-66, about 16:05 the following afternoon after the Grand Fleet was headed for home. Two torpedoes only badly damaged the cruiser, but follow-on attacks were unsuccessful due to the presence of the escorting destroyers. Shortly after she was struck, the armed trawler Cooksin went alongside and took off all of the men not required to work the ship. Falmouth was able to steam through the night under her own power at a speed of 2 knots (3.7 km/h; 2.3 mph), although a pair of tugboats came out the following morning and took her in tow. Her course took her right past U-63, which put another pair of torpedoes into her around noon, despite eight escorting destroyers. The cruiser remained afloat for another eight hours before sinking off Flamborough Head, Yorkshire.[16] No one was killed in the attacks, but one man later died of his injuries. She sits in 16 metres (52 ft) of water at 53°58.93′N 0°4.50′W. Her wreck was heavily salvaged after the war, but remains a popular diving site. (Wikipedia)
HMS Yarmouth
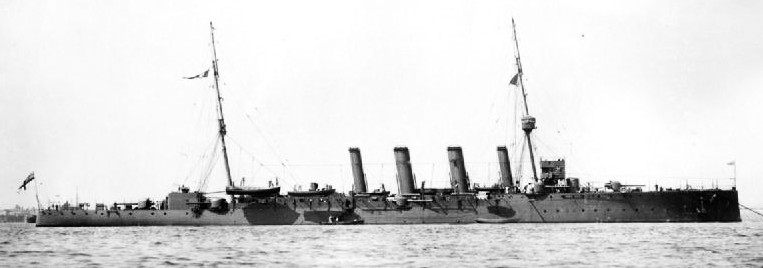
(IWM Photo, Q 40575)
HMS Yarmouth was a Town-class light cruiser of the Royal Navy launched on 12 April 1911 from the yards of the London & Glasgow Co. She was part of the Weymouth subgroup. On the outbreak of the First World War, Yarmouth was on the China Station, and later in 1914, she was involved in the hunt for the German commerce raider SMS Emden. In October that year she captured two German colliers. She returned to home waters in December 1914 and was assigned to the 2nd Light Cruiser Squadron of the Grand Fleet, and in February 1915 to 3rd Light Cruiser Squadron. Whilst serving with this squadron, she took part in the Battle of Jutland on 31 May-1 June 1916.
On 28 June 1917, Royal Naval Air Service Flight Commander F. J. Rutland took off in a Sopwith Pup from a flying-off platform mounted on the roof of one of Yarmouth’s gun turrets, the first such successful launch of an aircraft in history. On 21 August a Pup flown by Flight Sub-Lieutenant B. A. Smart flown from Yarmouth shot down the Zeppelin L 23 near Bovbjerg, Denmark.
HMS Yarmouth re-commissioned at Colombo, Ceylon, in June, 1918. She served as part of the 3rd Light Cruiser Squadron. She re-commissioned at Colombo again on 21st March, 1919. The flag of Rear-Admiral The Hon. Edward Stafford Fitzherbert, CB, Commander-in-Chief on the Africa Station, was flown in Yarmouth temporarily. In 1919, she stopped at Tristan da Cunha, the first ship in ten years, to inform the islanders of the outcome of the First World War After the war, she joined the 7th Light Cruiser Squadron on the South America Station. Yarmouth was sold for scrapping on 2 July 1929 to the Alloa South Breaking Company, of Rosyth. (Wikipedia)
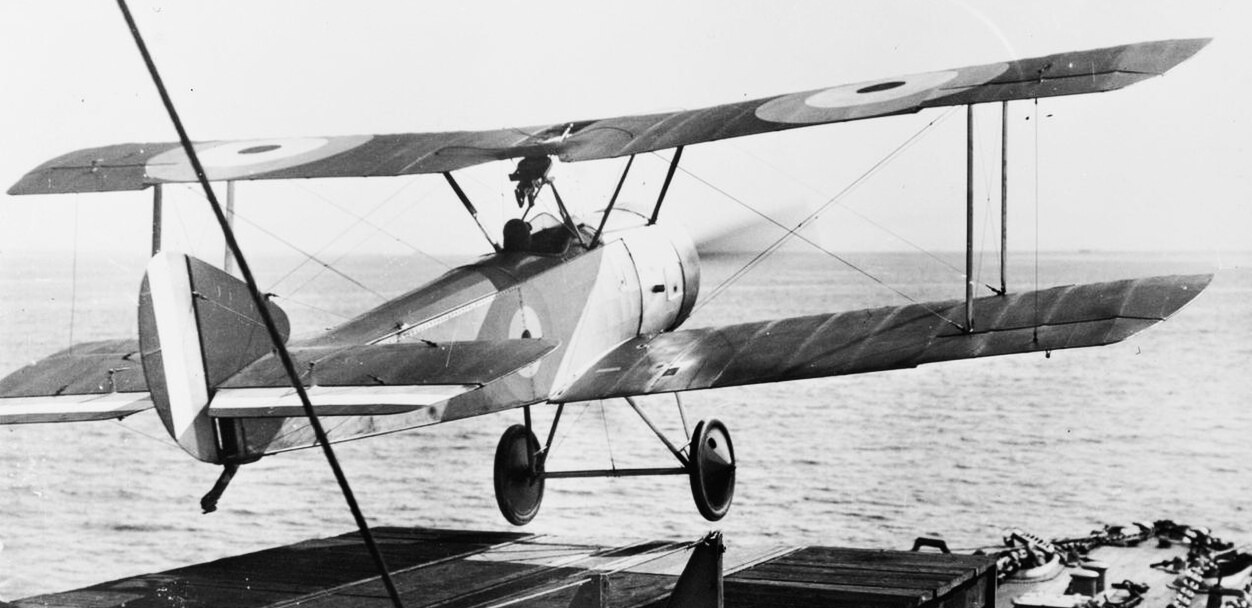
(IWM Phot, Q 65578)
The Sopwith Pup of Flight Commander Frederick Joseph Rutland, DSC and Bar, takes off from a platform on the forward gun turret of HMS Yarmouth, June 1917.
Chatham group 5,400 tons, eight 6-in guns.
HMS Chatham
(State Library of Victoria Photo)
HMS Chatham was a Town-class light cruiser built for the Royal Navy in the 1910s. She was the name ship of her sub-class of the Town class. The ship survived the First World War and was sold for scrap in 1926.
The ship was laid down on 3 January 1911 by Chatham Royal Dockyard and launched on 6 November. Upon completion in December 1912, Chatham was assigned to the 2nd Battle Squadron and was transferred to the 2nd Light Cruiser Squadron in the Mediterranean in July 1913.
Chatham remained part of the Mediterranean Fleet at the outbreak of the First World War, and was initially employed in the search for the German battlecruiser Goeben and cruiser Breslau, searching the Straits of Messina on 3 August. After the two German ships avoided the British forces and reached Turkey, Chatham was detached for operations in the Red Sea on 13 August 1914.
On 20 September that year, the German light cruiser Königsberg sank the old British cruiser Pegasus in Zanzibar harbour. In response, Chatham was ordered to East Africa to join up with sister ships Weymouth and Dartmouth and take part in the hunt for Königsberg, with Chatham’s Captain, Sidney Robert Drury-Lowe commanding the operation. Chatham arrived at Zanzibar on 28 September, but her participation in the search was delayed when, during the night of 1 October, cruising off Mombasa, she ran aground on the Leven Reef, just to the northward of the entrance to Kilindini Harbour.[8] While Chatham was only lightly damaged, she was under repair at Mombasa from 3 October to 15 October.
On 19 October Chatham’s boats found the German steamer Präsident 3.5 miles (5.6 km) upriver from the coastal town of Lindi, German East Africa (now Tanzania). While the Germans claimed that Präsident was a hospital ship, the British found no medical equipment on board and had not been notified of the German ship’s status and found documents aboard Präsident indicating that she had acted as a supply ship for Königsberg. The German ship was claimed as a Prize of war, but as Präsident’s engines were broken down, Chatham permanently disabled Präsident’s machinery before continuing the search for Königsberg.
On 30 October Chatham found Königsberg and the supply ship Somali up the Rufiji River, but owing to the shallowness of the river delta, could not closely approach the two German ships.[12] On 7 November Chatham hit Somali with a shell, causing a fire that destroyed the supply ship, while on 10 November the British scuttled the collier Newbridge in the main channel of the Delta, blocking Königsberg from escaping to sea. Chatham left East African waters on 2 January 1915 for the Mediterranean.
From May 1915 Chatham supported the Allied landings at Gallipoli. On 12–13 July 1915 she provided gunfire support to an attack along the Achi Baba Nullah dry water course on Cape Helles, and on 6–7 August took part in the Landing at Suvla Bay, acting as the flagship of Rear-Admiral John de Robeck, in command of Naval Forces during the operation. On 20 December Chatham acted as the flagship for Admiral Weymss during the evacuation from Suvla Bay and Anzac Cove.
In 1916 she returned to home waters and joined the 3rd Light Cruiser Squadron of the Grand Fleet. On 26 May 1916, Chatham struck a mine off the Norfolk coast and had to be towed to Chatham for repairs. The ship was placed in reserve in 1918. After the war, Chatham was lent to the New Zealand Division of the Royal Navy from 1920 to 1924, She proceeded via the Royal Naval Dockyard in the Imperial fortress colony of Bermuda (home base of the 8th Cruiser Squadron on the North America and West Indies Station), before cruising to the West Indies and becoming the first Royal Naval vessel from Bermuda to pass through the Panama Canal in December, 1920 (the geographic limits of the station controlled from Bermuda had grown over the preceding century from the western North Atlantic to absorb the area of the Jamaica Station, and following the first World War would absorb the former areas of the South East Coast of America Station and, utilising the canal, the Pacific Station, demonstrating the amity and the convergence of national interests between the United Kingdom and the United States).
During late June 1921, she carried out a search for the missing steamer SS Canastota. She was sold for scrapping on 13 July 1926 to Thos. W. Ward, of Pembroke Dock. In 1922, the crew of Chatham donated a cup to the New Zealand Football Association. This became the Chatham Cup, New Zealand’s local equivalent of the FA Cup, and its premier knockout football trophy. (Wikipedia)
HMS Dublin
(David Pounder Postcard Photo)
HMS Dublin, together with HMS Chatham and HMS Southampton, was a Town-class light cruiser of the Chatham subgroup, each costing an average £334,053. Dublin was laid down on 11 April 1911 by Wm. Beardmore & Company in Dalmuir (near Glasgow) Scotland. Dublin was launched on 30 April 1912 and completed in March 1913. She was initially assigned to the 1st Battle Squadron in 1913 and then to the 1st Light Cruiser Squadron in July 1913, operating in the Mediterranean. She was then reassigned to the 2nd Light Cruiser Squadron from September 1913 to the end of 1914.
Captain John Kelly pursued the German battlecruiser Goeben to Messina (off the north coast of Sicily) on 4 August 1914 just prior to the outbreak of the First World War. On 6 August after having completed coaling, Dublin left Malta at 14:00 to join Rear-Admiral Ernest Troubridge’s squadron. At 20:30 she received orders to obtain Goeben’s course and sink her during the night, by torpedoes if possible. Observing at a distance, Kelly expected to engage around 03:30 but Goeben had unexpectedly altered course to the north. The chase was lost as a daylight attack would be suicidal; Goeben’s largest guns could accurately fire explosive shells up to 10 miles (16 km) away.
In February 1915, Dublin was sent to the Dardanelles and subsequently assisted Implacable’s landing assault upon Gallipoli, on 25 April 1915 at X Beach. She was then sent to Brindisi in May 1915. While taking part in a sweep off the Albanian coast, and whilst escorted by French and Italian destroyers, Dublin was hit and damaged by a torpedo from the Austro-Hungarian Navy submarine U-4 on 9 June 1915. Dublin was able to get underway at 17 knots (31 km/h; 20 mph) and to return to Brindisi but was out of action for several months and had to return to the UK for refit.
Dublin served in the 2nd Light Cruiser Squadron alongside Southampton, Birmingham and Nottingham with the Grand Fleet from 1916 to 1919. Now under Captain Albert Charles Scott (later Vice Admiral; HMS Dublin 1916–1918), she participated in the Battle of Jutland on 31 May 1916. During the subsequent night actions, Dublin fired 117 6-inch shells and, along with Southampton, attacked and sank a destroyer. Both ships, however, sustained severe damage. Three crew members were killed and 27 wounded when Dublin received five 5.9 shell inch hits from the cruiser SMS Elbing and eight 4.1-inch shell hits from Stuttgart (possibly also Frauenlob and Hamburg). Subsequent repairs to Dublin were not completed until 17 June.
On 3 May 1917 in the North Sea, Dublin with the Australian cruiser HMAS Sydney and four destroyers (Nepean, Obdurate, Pelican, Pylades), left Rosyth for a sweep between the mouths of the Forth and the Humber. The following day, during an action in the North Sea, Dublin observed the Zeppelin L 43 about 17 miles away to the east at 10:25, rapidly approaching a strange vessel. Both cruisers promptly made for the enemy, opening fire on it at extreme range. At 10:54 Dublin saw the track of a torpedo passing ahead of her. At 11:12 a submarine was sighted and at 11:15 another one was spotted, which fired two torpedoes at her. At 11:20 she sighted a third submarine, which she engaged with her guns and on which she dropped a depth-charge. The Zeppelin made a direct attack: making for the stern of Dublin and rising hastily as it flew, it endeavoured to obtain a position vertically above the cruiser in order to drop bombs on her – an attempt which was foiled by Dublin’s hurried swerve to starboard.
Dublin was commissioned for the 6th squadron at the Africa Station from January 1920 until 1924, though she served for a short time in April with the 3rd squadron in the Mediterranean until being sent to the Reserve at Nore in 1924. She was sold for scrapping to J.J. King at Troon in July 1926, but she ran aground on the way to the breakers. She was refloated in July 1927 and broken up later that year. (Wikipedia)
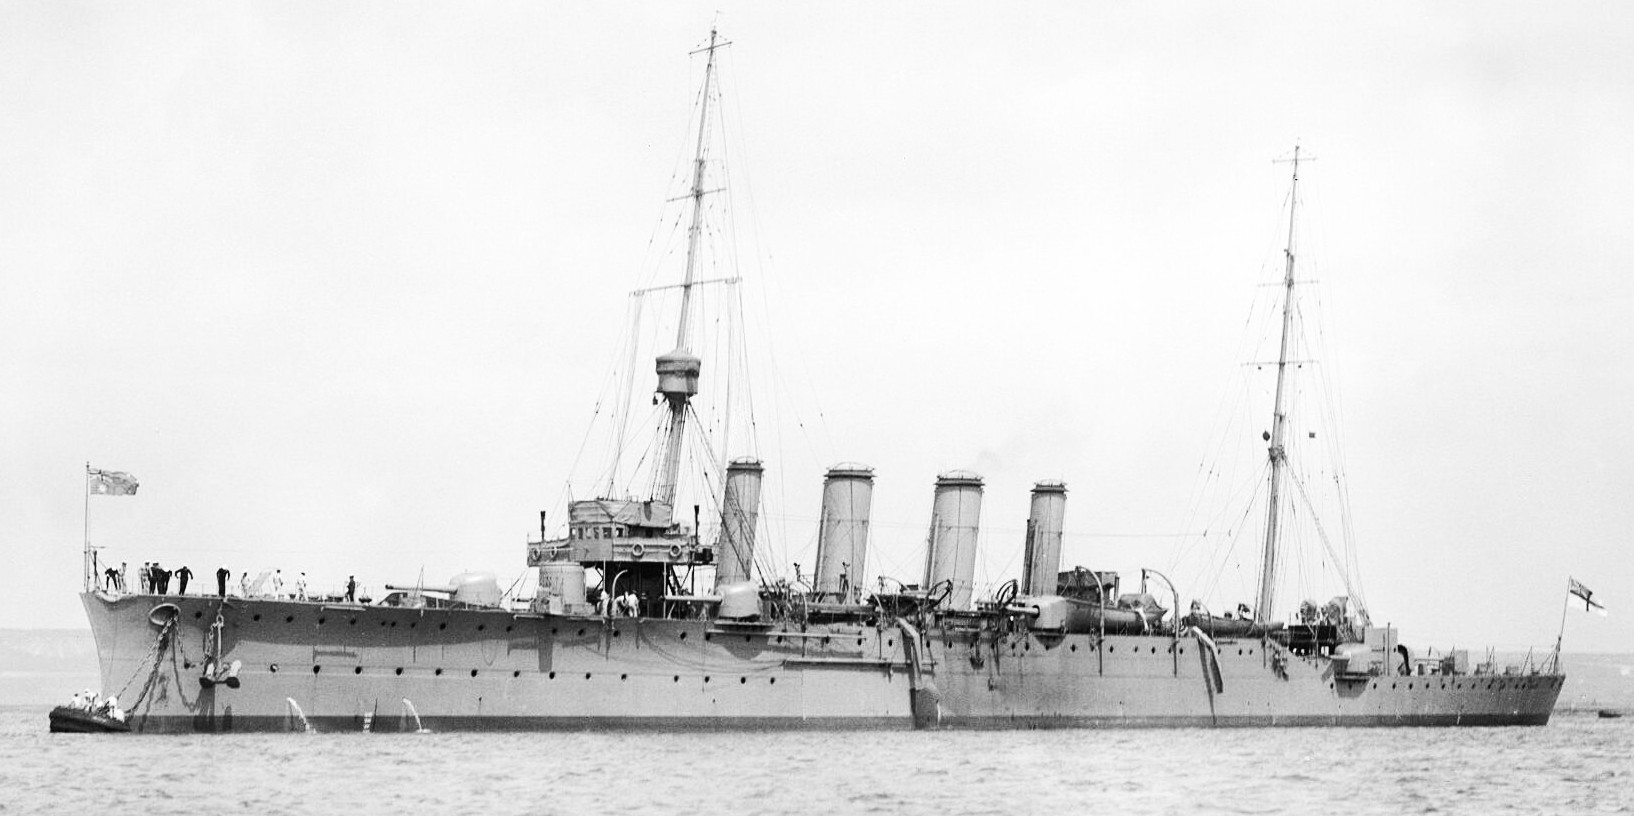
HMS Southampton
(IWM Photo, Q 75367)
HMS Southampton was a Town-class light cruiser built for the Royal Navy in the 1910s. She was a member of the Chatham sub-class of the Town class. The ship survived the First World War and was sold for scrap in 1926. Southampton was laid down on 6 April 1911 by John Brown & Company at their Clydebank shipyard and launched on 16 May 1912. Upon completion in November, the ship was assigned to the 1st Battle Squadron and she became flagship of the 1st Light Cruiser Squadron in July 1913.
The ship had an extremely active wartime career. Southampton participated in the Battle of Heligoland Bight, and later in the Battle of Dogger Bank in early 1915. In May 1916, Southampton fought in the Battle of Jutland as flagship of 2nd Light Cruiser Squadron where she torpedoed the German light cruiser SMS Frauenlob, which subsequently sank. In 1917, she was transferred to the 8th Light Cruiser Squadron with whom she remained for the rest of the war. Southampton was sold for scrapping on 13 July 1926 to Thos. W. Ward, of Pembroke Dock.
HMAS Brisbane
( State Library of Victoria Photo)
HMAS Brisbane was a Town class light cruiser of the Royal Australian Navy (RAN). Built in Sydney between 1913 and 1916 to the Chatham subtype design, Brisbane operated in the Indian Ocean, Pacific Ocean, and Australian coastal waters during the First World War.
Following the end of the war, the cruiser was decommissioned and recommissioned on several occasions, and was reclassified as a training ship in late 1925. In 1935, Brisbane was reactivated to transport personnel to Britain for training on the new cruiser HMAS Sydney, after which she was decommissioned and sold for breaking up as scrap. (Wikipedia)
On 13 December 1916, Brisbane departed on a voyage to the Mediterranean. After reaching Malta on 4 February, the ship was fitted with equipment not available in Australia at the time. Soon after, the ship was redeployed to Colombo, and employed on Indian Ocean patrols to search for the German raiders Wolf and Seeadler.
In February 1917, a Sopwith Baby seaplane was acquired from HMS Raven II for reconnaissance work; the first aircraft to be used by a RAN ship. This remained aboard until June, when Brisbane was sent back to Australia with orders to patrol the Western Australian coast. From October 1917, the cruiser was assigned to operations in the western Pacific in response to reports of German raider activity. Initially deployed to the Solomon Islands, Brisbane visited Nauru, the Gilbert Islands, and Fiji, before returning to duties in Australian waters in January 1918.
On 21 October 1918, Brisbane departed for the eastern Mediterranean, and was between Colombo and Suez when the First World War ended. The battle honour “Indian Ocean 1917” recognizes the cruiser’s wartime service. The ship reached Moudros in late November, and spent most of December operating with the Australian Destroyer Squadron, before visiting Smyrna and the Dardanelles.
Brisbane reached the United Kingdom before the end of December 1918, and began refitting at Portsmouth. The most visible aspect of the refit was the installation of a tripod mast. The cruiser remained in British waters until 17 April 1919, when she departed from Portsmouth for home. During the return trip, she caught up with the submarine depot ship HMAS Platypus and the six J class submarines transferred from the Royal Navy to the RAN after the war, and relieved HMAS Sydney as their escort. J5 was experiencing problems, and Brisbane took the boat under tow: the two vessels reached Sydney on 27 June. The cruiser operated in Australian waters until 4 August 1922, when she was decommissioned into reserve.
Brisbane was reactivated on 14 April 1923. On 23 July 1924, she ran aground off Port Moresby, New Guinea; she was refloated later that day. From February until August 1925, the ship served with the Royal Navy’s China Squadron as part of an exchange, with HMS Concord sent to Australia.[5] While deployed with the China Squadron, Brisbane became the first RAN ship to visit Japan. The cruiser was placed back in reserve on 7 October, underwent a refit, and recommissioned on 17 November as a training ship attached to Flinders Naval Depot. A longer period of decommissioning and refit ran from 30 October 1926 until 28 June 1928, when she resumed training duties. In August 1928, Brisbane visited Hawaii, and was present for celebrations commemorating the 150th anniversary of the islands’ discovery. The cruiser was again decommissioned, on 16 August 1929.
Brisbane was commissioned for the final time on 2 April 1935, for the specific purpose of conveying the ship’s company of the new cruiser HMAS Sydney to their ship in Britain. During the voyage, the cruiser assisted the British sloop HMS Hastings. Brisbane reached Portsmouth on 12 July 1935, and was decommissioned on 24 September. She was the last coal-fuelled cruiser operational in any British Empire navy. On 13 June 1936, Brisbane was sold to Thos. W. Ward for A£19,215 to be broken up. The cruiser was scrapped at Briton Ferry, Wales by the end of 1936. (Wikipedia)
HMAS Melbourne
(IWM Photo, Q 75369)
HMAS Melbourne was a Town class light cruiser operated by the Royal Australian Navy (RAN). The ship was laid down by Cammell Laird at Birkenhead in England in 1911, launched in 1912 and commissioned in 1913. At the start of the First World War, Melbourne was involved in attempts to locate the German East Asia Squadron, and participated in the capture of German colonies in the Pacific, before being assigned to the North America and West Indies Stations. In 1916, the cruiser joined the Grand Fleet in the North Sea, where she remained for the remainder of the war. Melbourne spent late 1919 and early 1920 in reserve, then was flagship of the Royal Australian Navy from 1920 until 1928, except for a second period in reserve during 1924 and 1925. HMAS Melbourne paid off in the United Kingdom on 23 April 1928, and was scrapped in 1929. (Wikipedia)
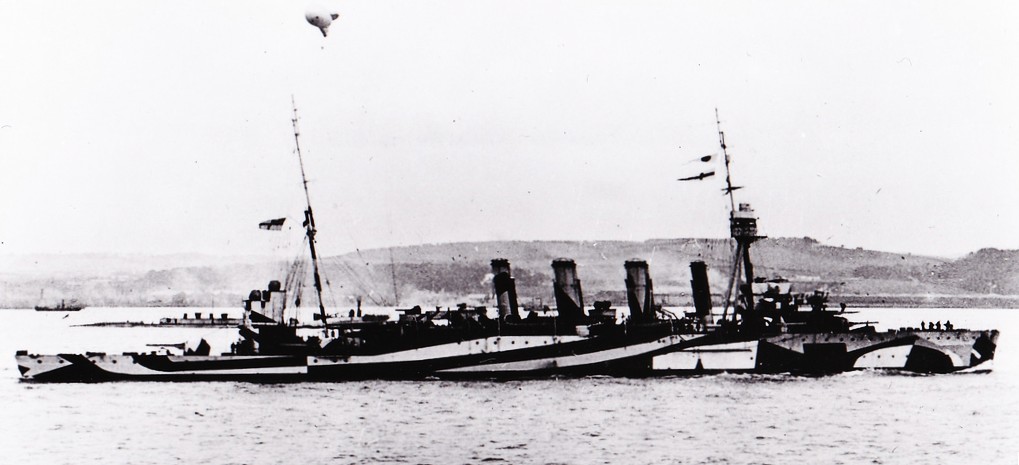
(RAN Photo)
HMAS Melbourne shown here in 1918. She was the only ship of the RAN to be painted in dazzle camouflage during the First World War.
HMAS Sydney
(IWM Photo, Q 21817)
HMAS Sydney was a Chatham-class light cruiser of the Royal Australian Navy (RAN). Laid down in 1911 and launched in 1912, the cruiser was commissioned into the RAN in 1913. During the early stages of the First World War, Sydney was involved in supporting the Australian Naval and Military Expeditionary Force, and escorting the first ANZAC convoy. On 9 November 1914, she defeated the German cruiser SMS Emden at the Battle of Cocos. During 1915 and 1916, Sydney operated on the North America and West Indies Station, before joining the 2nd Light Cruiser Squadron at Greenock, Scotland in November 1916. On 4 May 1917, the cruiser was involved in an inconclusive action against the German zeppelin L43; neither was damaged. During late 1917, Sydney became the first Australian warship to launch an aircraft, and the first warship to do so from a rotatable platform.
After the war’s end, Sydney spent a year in reserve before being reactivated to serve as Flagship of the RAN. The cruiser was decommissioned in 1928 and broken up for scrap. Several sections of the ship, including her bow and foremast, have been preserved as monuments, and three of the ship’s main guns saw later use in shore fortifications. (Wikipedia)