Kaiserliche Marine armoured Cruisers: SMS Fürst Bismarck, SMS Prinz Heinrich, SMS Prinz Adalbert, SMS Friedrich Carl, SMS Roon, SMS Yorck, SMS Scharnhorst, SMS Gneisenau, SMS Blücher
The first armoured cruiser, Fürst Bismarck, was ordered shortly after the Victoria Louise class of protected cruisers. Fürst Bismarck was an improved version of the earlier type, with heavier armament, more extensive armor protection, and a significantly greater size. A further seven units, divided between four different designs, followed over the next ten years; each design provided incremental improvements over earlier vessels. A ninth armored cruiser, Blücher, was a much larger vessel representing an intermediate step between armored cruisers and battlecruisers. Indeed, her design had been influenced by the misinformation Britain had released about its Invincible-class battlecruisers, which were then under construction. Once the characteristics of the new ships were revealed, Germany began building battlecruisers in response.
Germany’s armored cruisers served in a variety of roles, including overseas as flagships of the East Asia Squadron, and in the fleet reconnaissance forces. All of them, save Fürst Bismarck, saw action during the First World War in a variety of theaters. Blücher served with the battlecruisers in the I Scouting Group and was sunk at the Battle of Dogger Bank in 1915, and the two Scharnhorst-class cruisers formed the core of Maximilian von Spee’s squadron that defeated the British at the Battle of Coronel in November 1914 before being annihilated at the Battle of the Falkland Islands.[35] Yorck was accidentally sunk by a German mine in November 1914 outside Wilhelmshaven, and the two Prinz Adalbert-class cruisers were sunk in the Baltic Sea. Only Prinz Heinrich and Roon survived the war; both were scrapped in the early 1920s. (Wikipedia)
SMS Fürst Bismarck
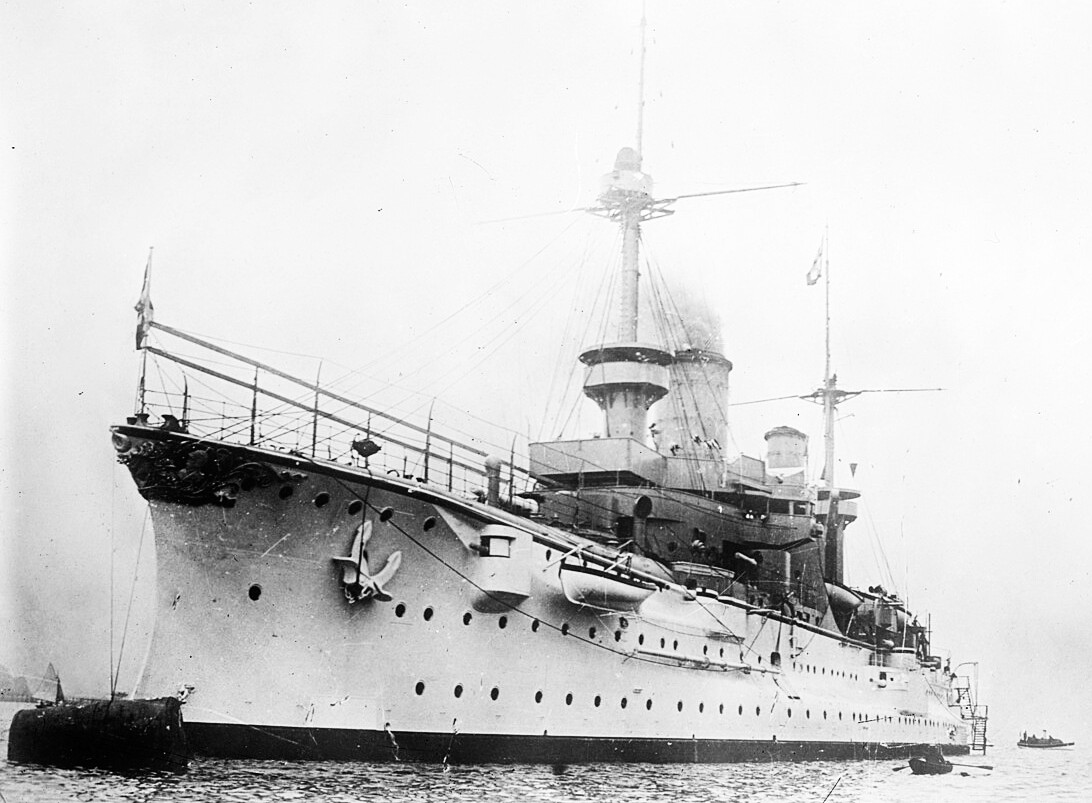
(Library of Congress Photo)
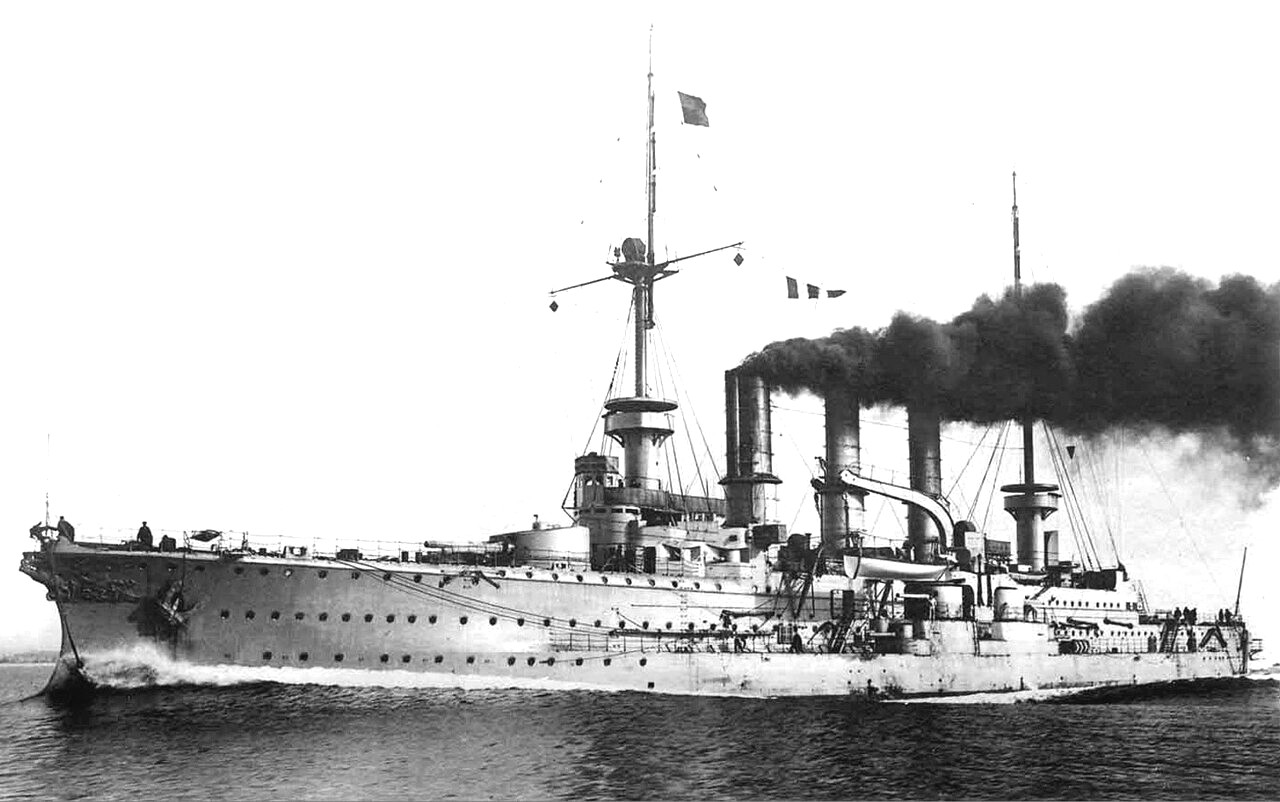
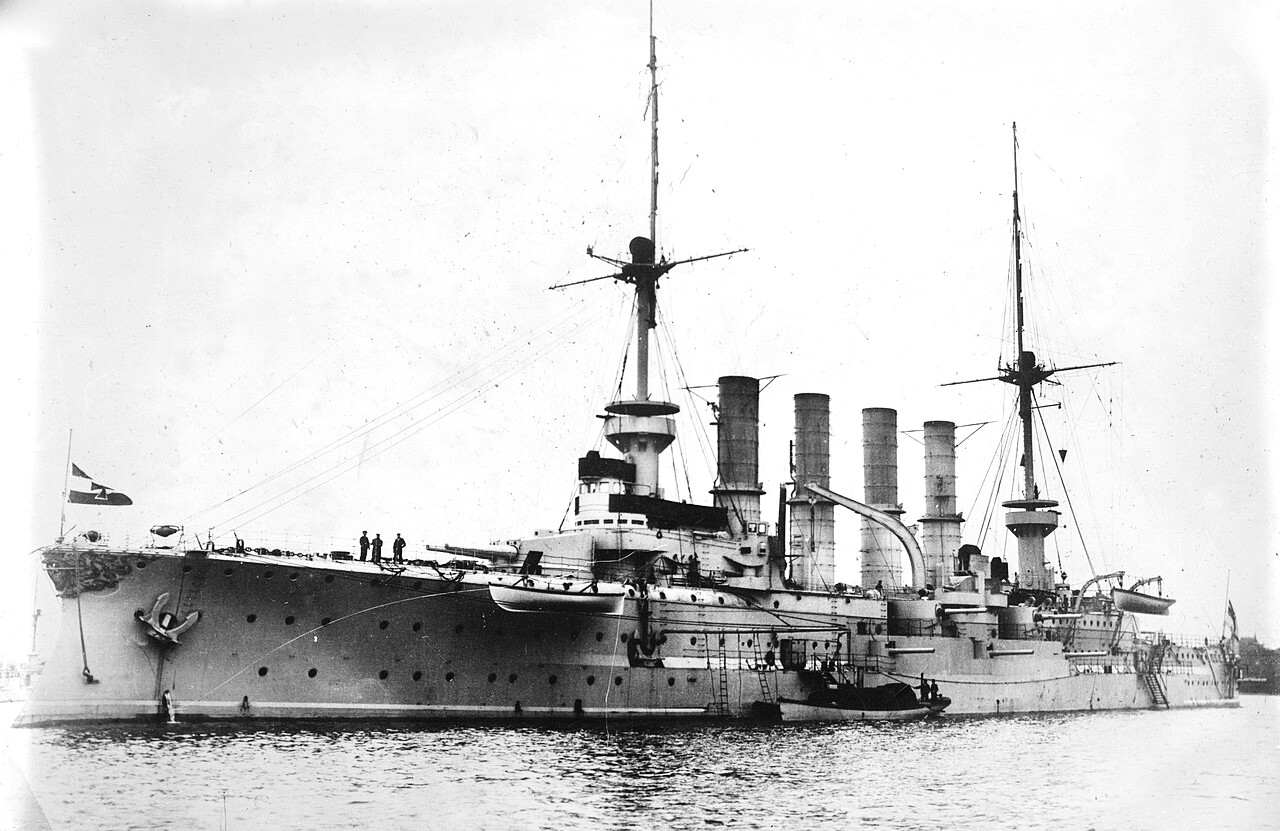
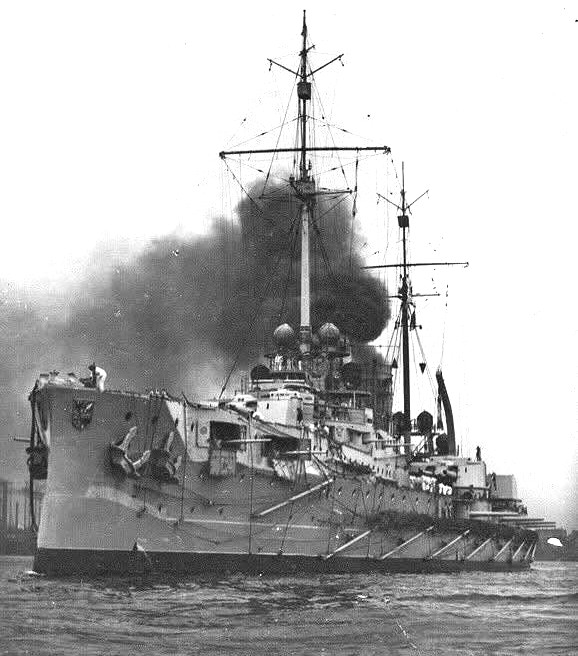
SMS Fürst Bismarck (Prince Bismarck) was Germany’s first armoured cruiser, built for the Kaiserliche Marine (Imperial Navy) in the late 1890s. Ordered in response to widespread foreign adoption of the ship type, the Germans built Fürst Bismarck to serve abroad in the German colonial empire and as a scout for the main fleet in home waters. The ship’s design emerged from a failed 1890s design competition that was heavily influenced by the new emperor, Kaiser Wilhelm II. Though that failed to produce a workable design, further efforts resulted in the development of Fürst Bismarck, which was in many respects a cruiser version of the contemporary Kaiser Friedrich III class of battleships. Fürst Bismarck carried the same main battery of four 24 cm (9.4 in) guns as the battleships, but was faster due to a longer, lighter hull and more powerful engines.
The Germans worked to finish construction on the ship as early as possible after the outbreak of the 1899 Boxer Uprising in China; Fürst Bismarck arrived there in late 1900, becoming the flagship of the East Asia Squadron. Most of the initial fighting had taken place by the time the ship arrived, but she participated in a blockade of the Yangtze as part of the campaign to defeat the Boxers. From 1901 to 1909, Fürst Bismarck remained on station as the squadron flagship; most of her time was spent on routine patrols in the region, training exercises with other ships of the squadron, and visits to foreign ports. In 1904, during the Russo-Japanese War, a pair of damaged Russian warships sheltered at the German naval base at Qingdao, so Fürst Bismarck and other units of the squadron had to intern them for the rest of the conflict.
By 1909, Fürst Bismarck was in poor condition and needed to return home for extensive repairs. She was recalled in April 1909, and the new armored cruiser Scharnhorst was sent to relieve her. After arriving in Germany, Fürst Bismarck was drydocked in 1910 for repairs and a modernization that lasted into late 1914, by which time World War I had started. The ship thereafter served as a training vessel, as she was no longer suitable to serve in a combat capacity. Over the course of 1915 and 1916, she was disarmed before returning to training duties. Following Germany’s defeat in late 1918, Fürst Bismarck was struck from the naval register in June 1919 and shortly thereafter sold to ship breakers. Demolition was completed the following year. (Wikipedia)
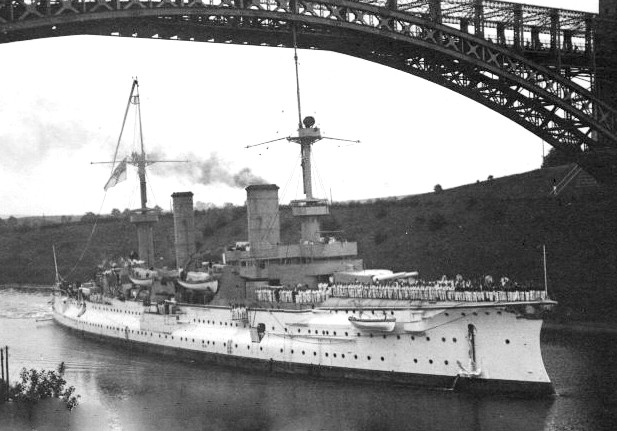
(Kaiserliche Marine Photo)
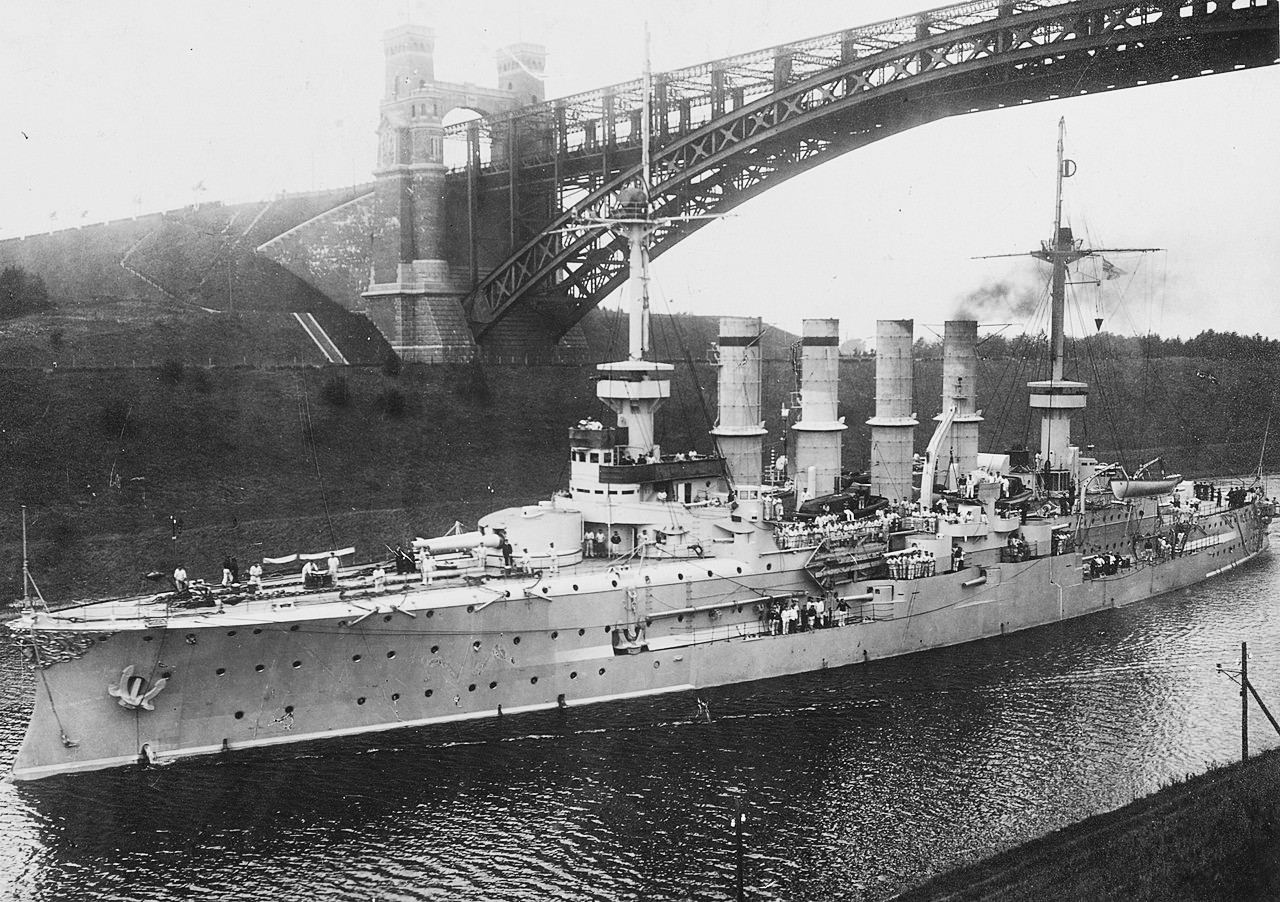
SMS Fürst Bismarck passing under the Levensau High Bridge after returning from the East Asia Squadron on 13 June 1909.
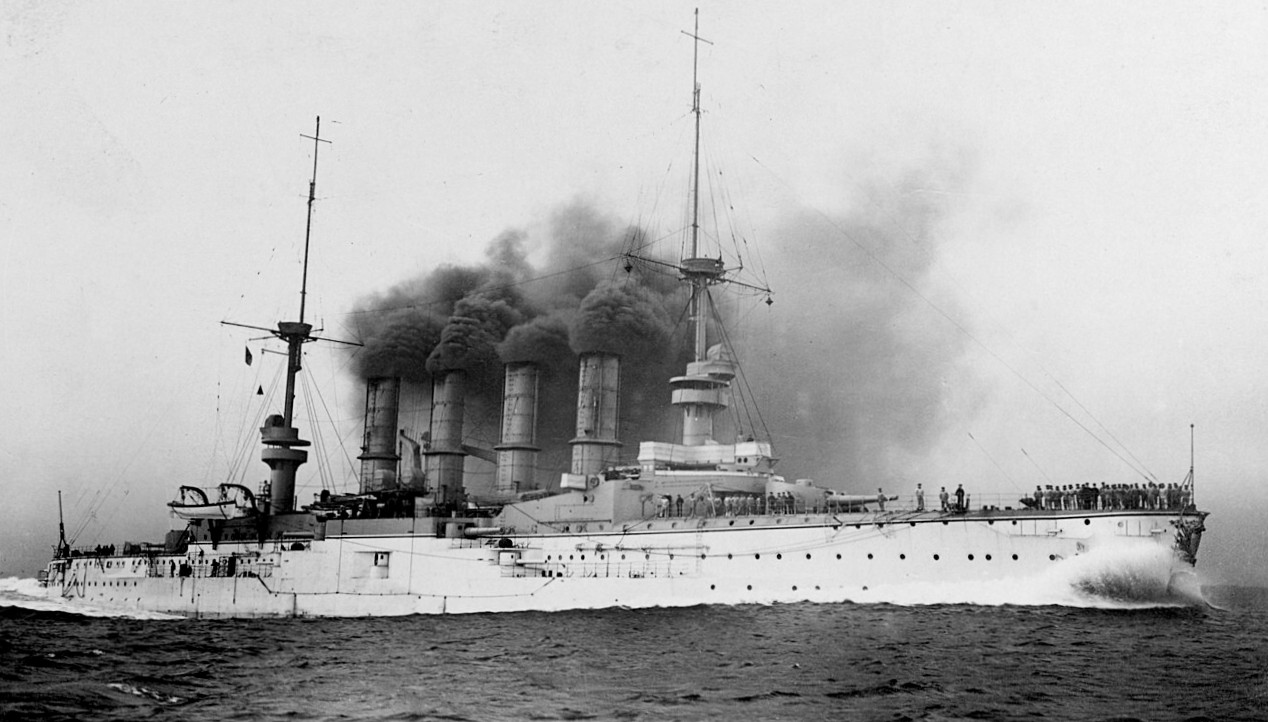
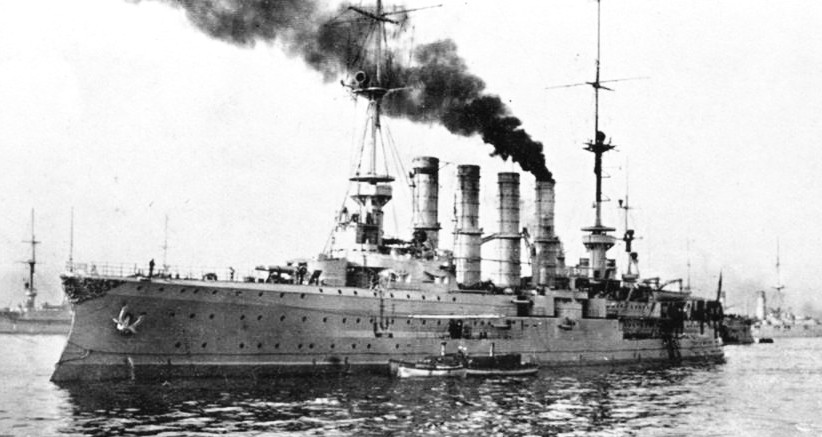
SMS Prinz Heinrich

(Kaiserliche Marine Photo)
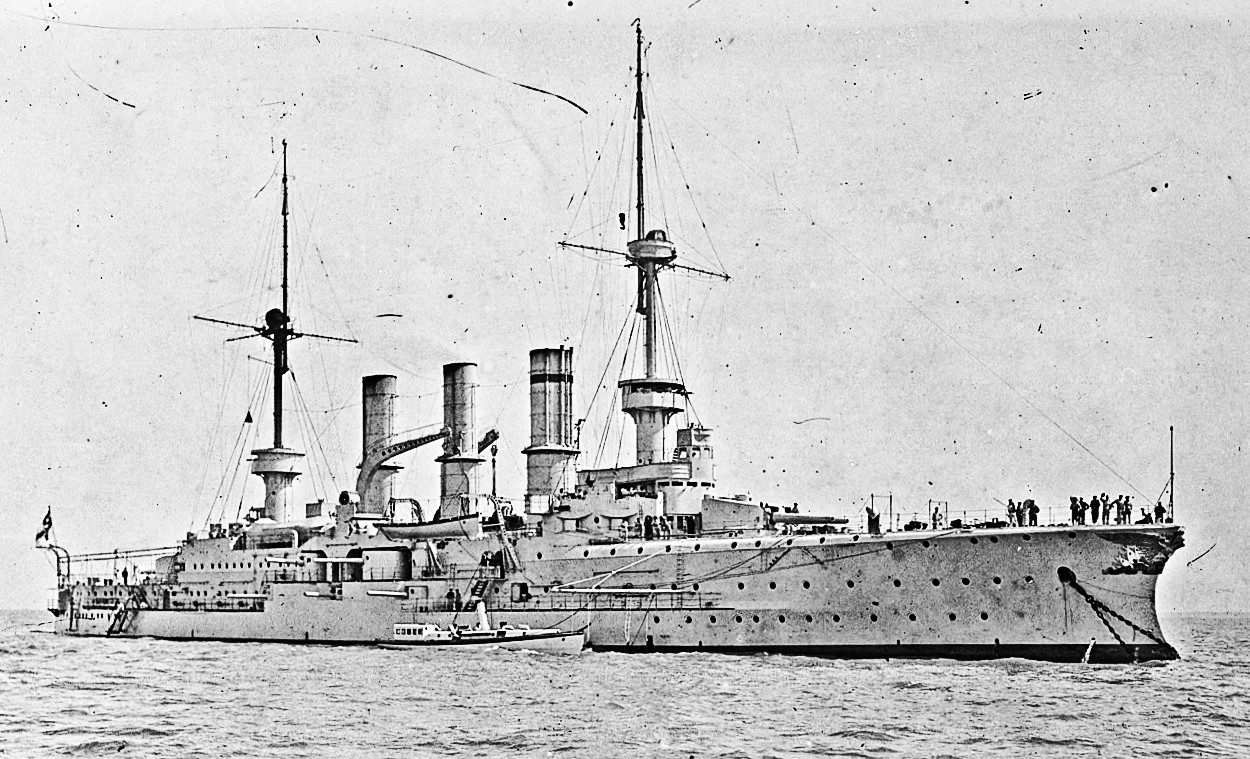
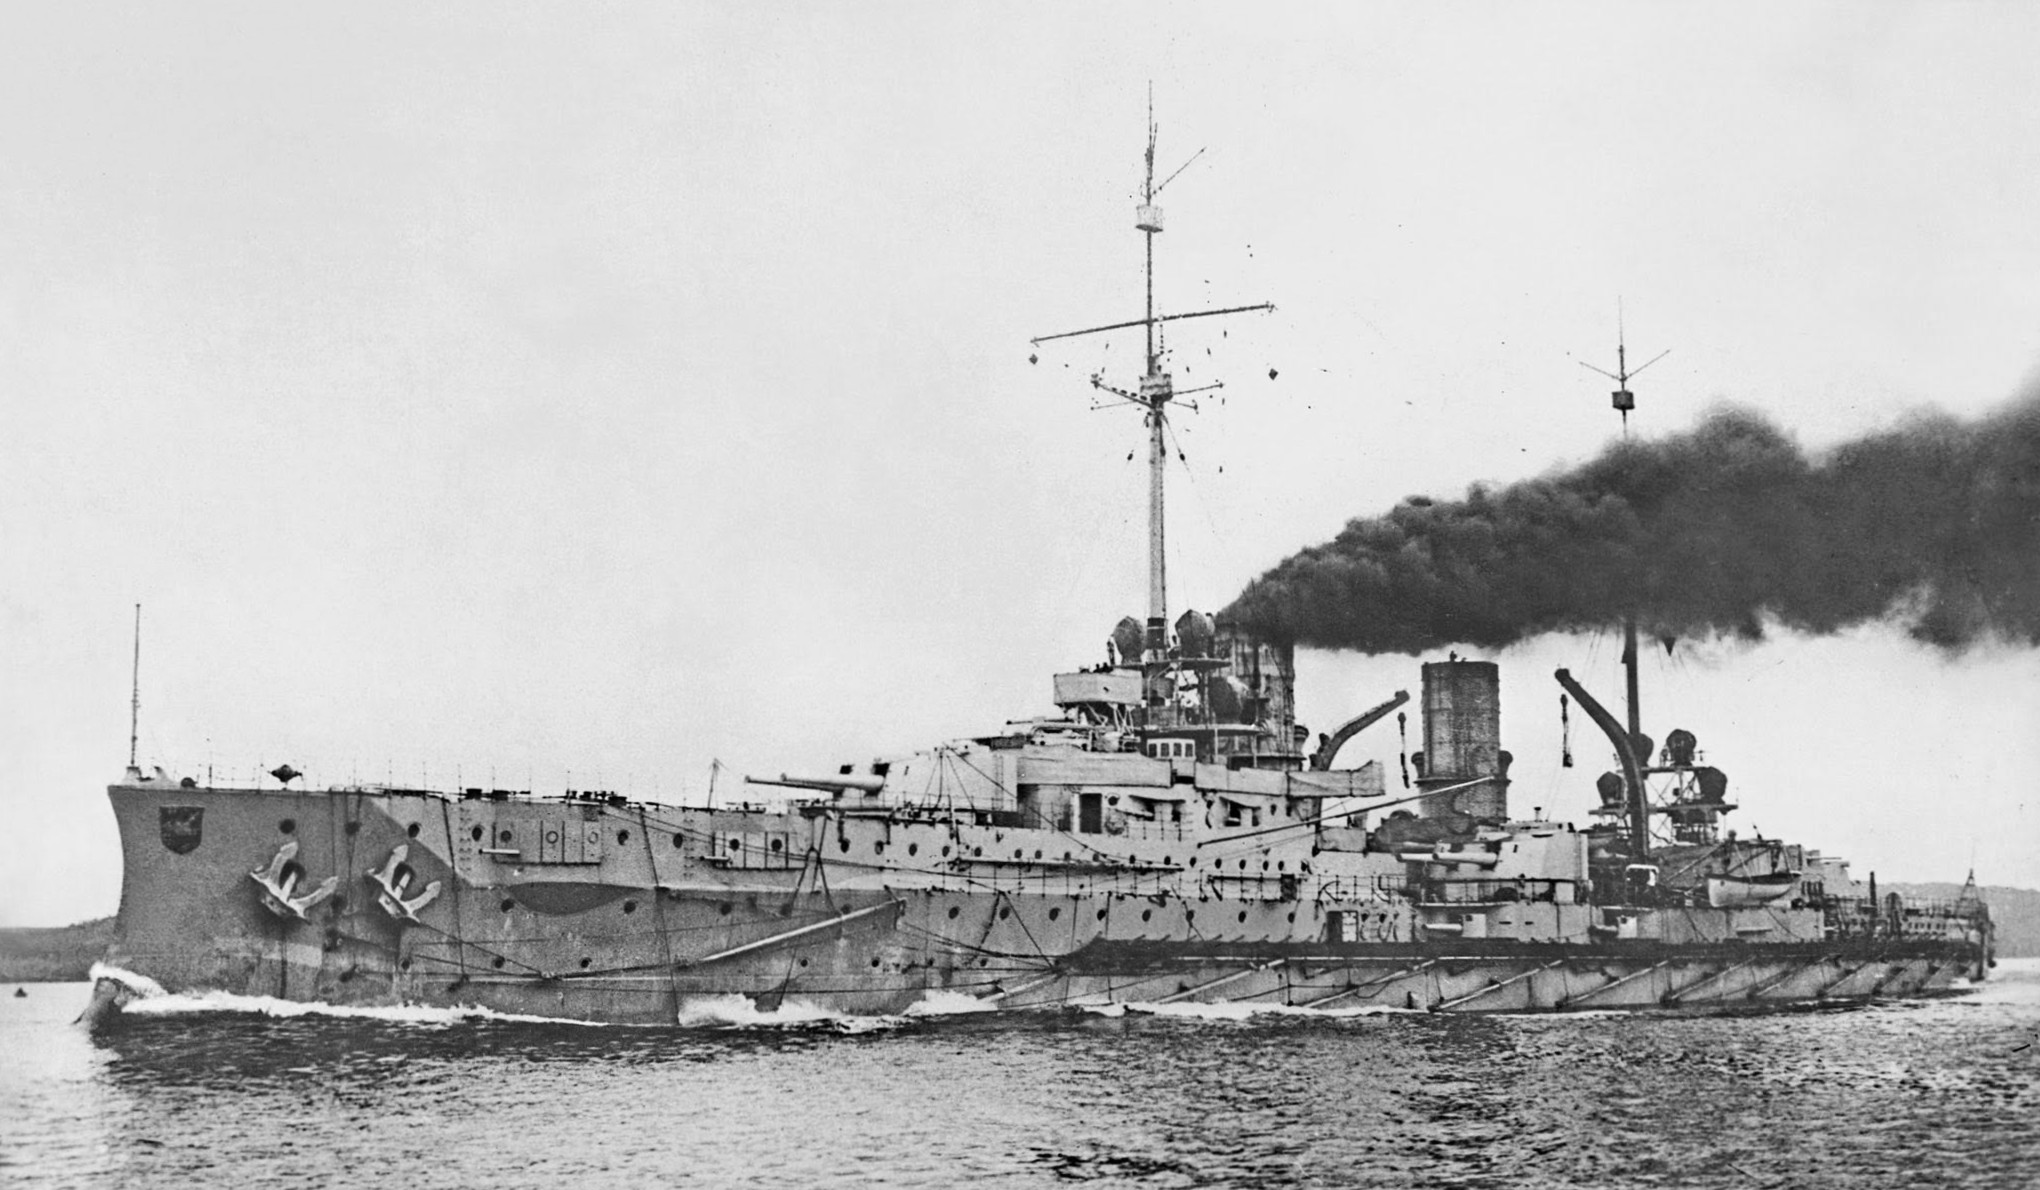
SMS Prinz Heinrich was a unique German armored cruiser built at the turn of the 20th century for the German Kaiserliche Marine (Imperial Navy), and was named after Prince Heinrich. The second vessel of that type built in Germany, Prinz Heinrich was constructed at the Kaiserliche Werft (Imperial Shipyard) in Kiel, being laid down in December 1898, launched in March 1900, and commissioned in March 1902. Prinz Heinrich’s design was a modification of the previous armored cruiser, Fürst Bismarck, and traded a smaller main battery and thinner (but more effective) armor for higher speed. All subsequent German armored cruisers were incremental developments of Prinz Heinrich.
Prinz Heinrich served with the German fleet in home waters for just four years, from 1902 to 1906, when she was withdrawn from front-line service. During this period, she served as the flagship of the fleet’s Scouting Forces, and she was primarily occupied with fleet training. The ship was out of service from early 1906 to mid-1908, when she was reactivated for use as a gunnery training ship, a role she filled until late 1912. Prinz Heinrich underwent modernization and conversion into a dedicated training ship in 1914, and the work was completed just before the outbreak of the First World War in July that year.
After the start of war, the ship was reactivated for active service, initially with III Scouting Group with the High Seas Fleet. Prinz Heinrich was used for coastal defense in the North Sea and she participated in the fleet sortie that supported the raid on Scarborough, Hartlepool and Whitby in December 1914. After the naval command determined Prinz Heinrich was too old to serve in the North Sea against the powerful British Royal Navy, she was transferred to the Baltic Sea in early 1915. She supported offensive minelaying operations and patrolled the central Baltic for Russian forces, but never encountered any. She provided gunfire support during the attack on Libau in May 1915 and again shelled Russian positions during the Battle of the Gulf of Riga in August. In the face of severe crew shortages in late 1915, Prinz Heinrich had her crew reduced and was ultimately decommissioned and disarmed in March 1916. She thereafter served in a variety of secondary roles for the rest of the war, before being sold to be broken up in 1920. (Wikipedia)
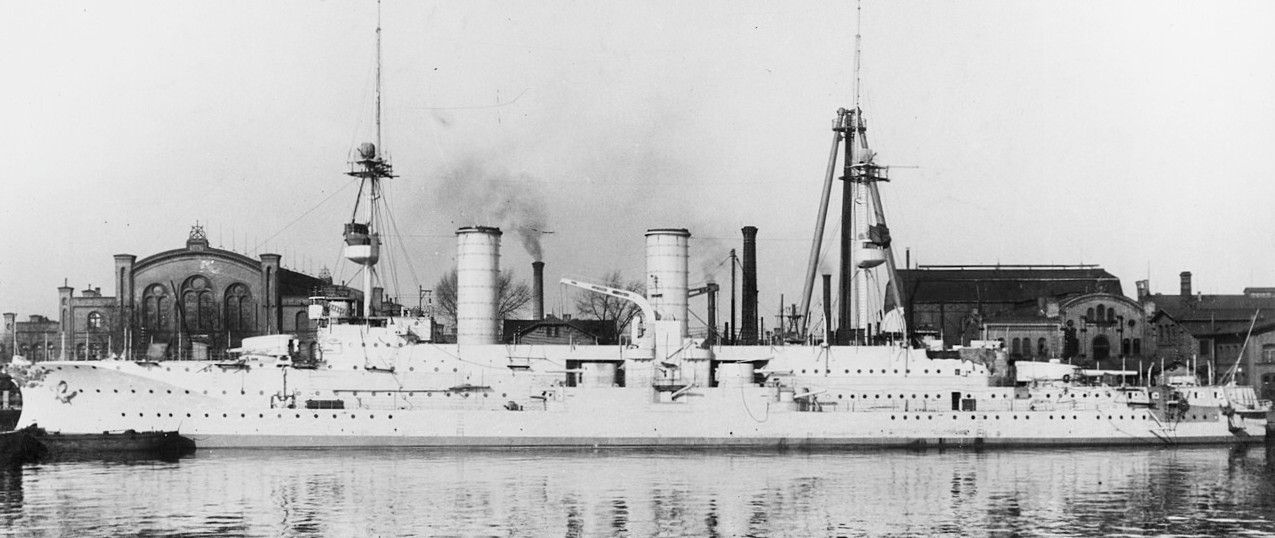
(Arthur Renard Photo)
SMS Prinz Heinrich, 1902.
(Kaiserliche Marine Photo)
SMS Prinz Heinrich in the Kiel Canal.
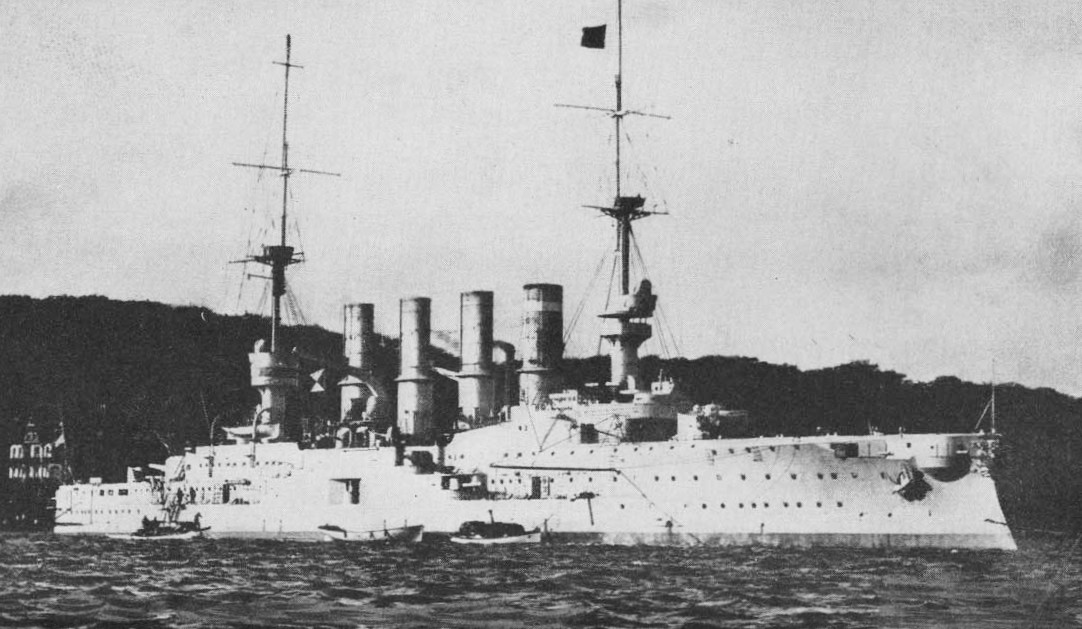
SMS Prinz Adalbert
(Library of Congress Photo)
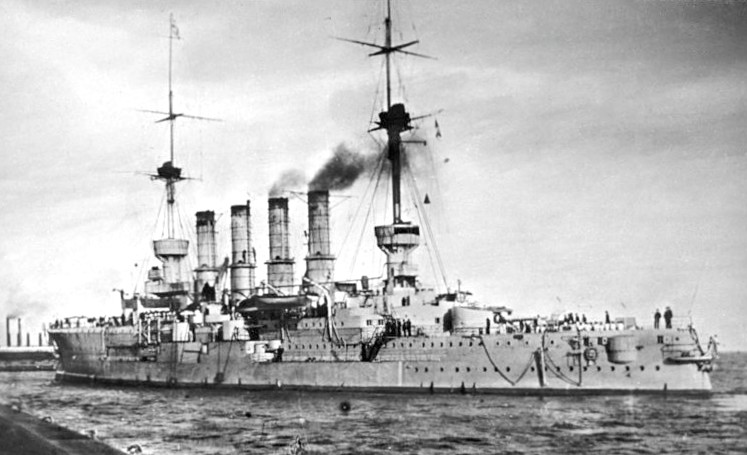
SMS Prinz Adalbert (‘His Majesty’s Ship Prince Adalbert’) was an armoured cruiser built in the early 1900s for the Imperial German Navy. She was named after the earlier screw corvette Prinz Adalbert, and was the lead ship of her class.
Prinz Adalbert was built at the Imperial Dockyard in Kiel. Her keel was laid in April 1900, and she was launched in June 1901. Her completion in January 1904 had been delayed by an excess of construction projects at the Imperial Dockyard. She was armed with a main battery of four 21 cm (8.3 in) guns, a significant improvement over the previous armored cruiser, Prinz Heinrich, which carried only two 24 cm (9.4 in) guns. The ship was capable of a top speed of 20 knots (37 km/h; 23 mph).
Upon commissioning, Prinz Adalbert served as a gunnery training ship, a role she held for the majority of her career. She trained with the Home Fleet, later renamed the High Seas Fleet, throughout the early 1900s, and she made several visits to foreign countries. After the outbreak of the First World War in July 1914, she was assigned to the reconnaissance forces in the Baltic and was tasked with protecting the German coast from Russian attacks. After her sister ship was sunk in November 1914, she became the flagship of the cruiser squadron in the Baltic. She conducted operations against Russian forces, including bombarding the port of Libau in support of the German Army. She was torpedoed by a British submarine in July 1915, but was able to return to port and was repaired. She was torpedoed a second time on 23 October 1915; the torpedo detonated her ammunition magazines, rapidly sinking the ship. Only three men were rescued from a crew of 675, in the worst German naval loss in the Baltic during the war. (Wikipedia)
SMS Friedrich Carl
(Gallica Digital Library Photo)
SMS Friedrich Carl was a German armored cruiser built in the early 1900s for the German Kaiserliche Marine (Imperial Navy). She was the second and final member of the Prinz Adalbert class, which was built to provide scouts for the German fleet and station ships in Germany’s colonial empire. Friedrich Carl was built by the Blohm & Voss shipyard in Hamburg. She was laid down in August 1901, launched in June 1902, and commissioned in December 1903. She was armed with a main battery of four 21 cm (8.3 in) guns and could reach a top speed of 20 knots (37 km/h; 23 mph).
Friedrich Carl served with the scouting forces of the Active Battle Fleet for the first few years of her career, including a stint as the flagship of the reconnaissance squadron. She went on cruises abroad, including voyages escorting Kaiser Wilhelm II on tours in the Mediterranean Sea. She also participated in extensive training exercises in the Baltic and North Seas. In 1909, she was withdrawn from front-line service and used as a torpedo training ship until 1914.
After the outbreak of the First World War in July 1914, Friedrich Carl returned to active service for operations in the Baltic Sea against the Imperial Russian Navy. She served as the flagship of the cruiser squadron in the Baltic and participated in patrols in the Gulf of Finland. The ship was modified to carry a pair of seaplanes. In mid-November, the cruiser squadron was tasked with attacking the Russian base at Libau, but while en route on 17 November, Friedrich Carl struck a pair of naval mines. She remained afloat long enough for most of her crew to be taken off by the light cruiser SMS Augsburg before sinking; seven or eight men died as she sank. (Wikipedia)
(Gallica Digital Library Photo)
SMS Friedrich Carl, 1914.
(Kaiserliche Marine Photo)
SMS Friedrich Carl, 1904.
SMS Roon
(Library of Congress Photo, c1907.
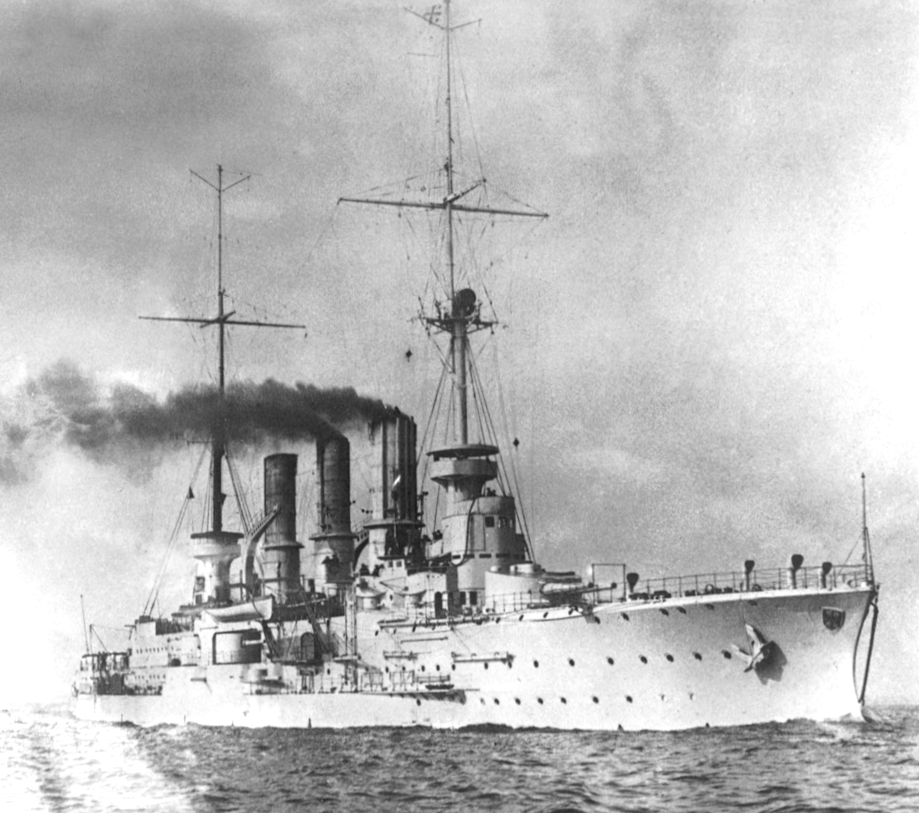
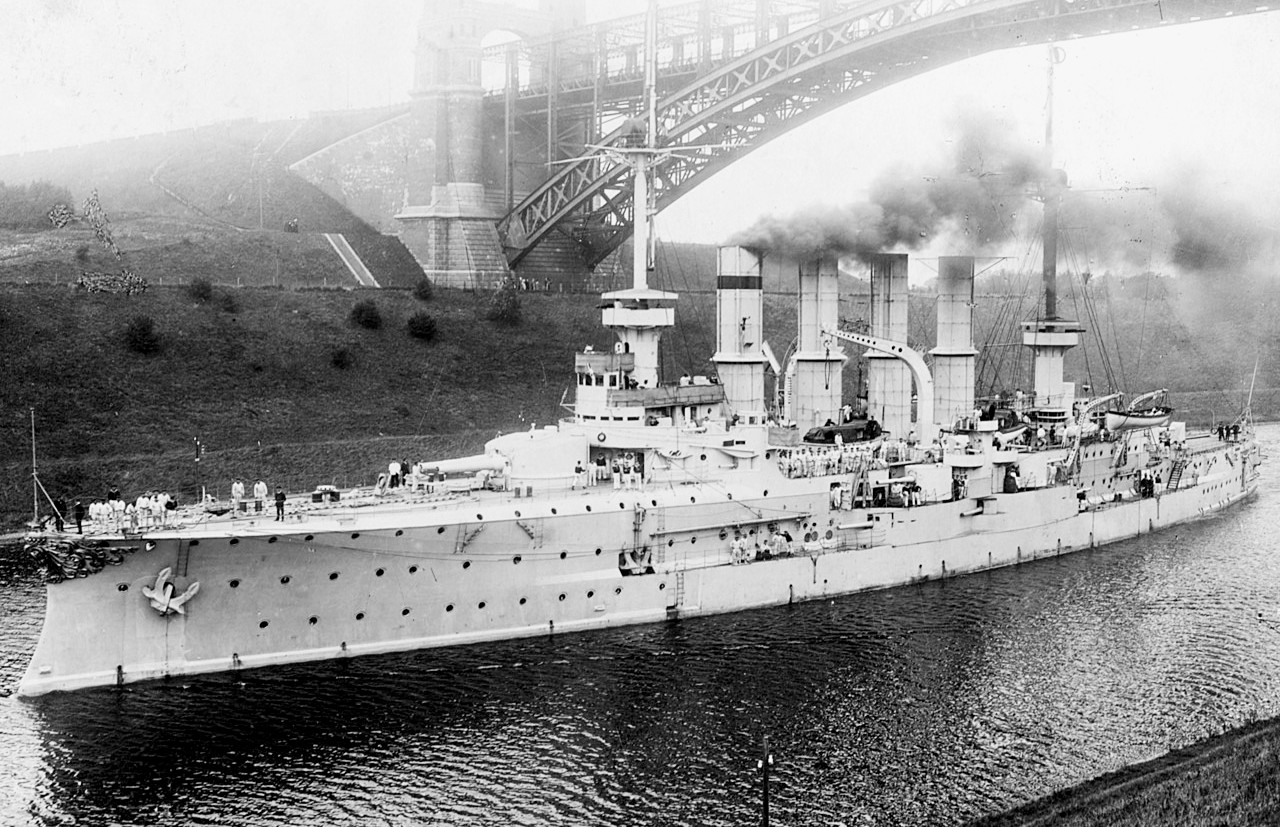
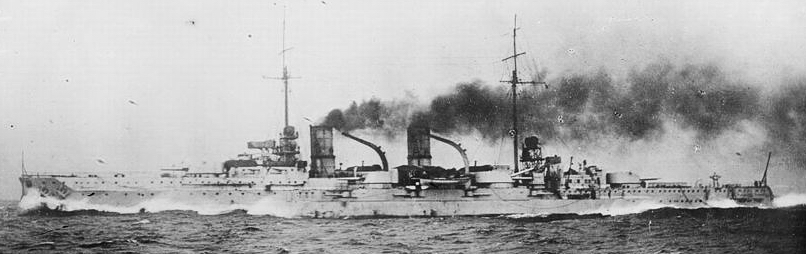
SMS Roon was the lead ship of her class of armoured cruisers built for the German Kaiserliche Marine (Imperial Navy) in the early 1900s as part of a major naval expansion program aimed at strengthening the fleet. The ship was named after Field Marshal Albrecht von Roon. She was built at the Kaiserliche Werft in Kiel, being laid down in August 1902, launched in June 1903, and commissioned in April 1906. The ship was armed with a main battery of four 21 cm (8.3 in) guns and had a top speed of 20.4 knots (37.8 km/h; 23.5 mph). Like many of the late armored cruisers, Roon was quickly rendered obsolescent by the advent of the battlecruiser; as a result, her career was limited.
Roon served in I Scouting Group, the reconnaissance force of the High Seas Fleet, for the duration of her peacetime career, including several stints as the flagship of the group’s deputy commander. During this period, the ship was occupied with training exercises and made several cruises in the Atlantic Ocean. In 1907, she visited the United States to represent Germany during the Jamestown Exposition. In September 1911 she was decommissioned and placed in reserve.
Three years later, the ship was mobilized in August 1914 following the outbreak of World War I and assigned to III Scouting Group, serving initially with the High Seas Fleet in the North Sea. There, she escorted the main German fleet during the raid on Yarmouth in November and the raid on Scarborough, Hartlepool and Whitby in December, though she saw no action during either operation. She was transferred to the Baltic Sea in April 1915 and took part in several operations against Russian forces, including the successful attack on Libau in May and the failed attack on Riga in August. The threat of British submarines convinced the German command to withdraw old vessels like Roon by early 1916, and she was again decommissioned and eventually used as a training ship. Plans to convert her into a seaplane tender in 1918 came to nothing with the end of the war, and she was broken up in 1921. (Wikipedia)
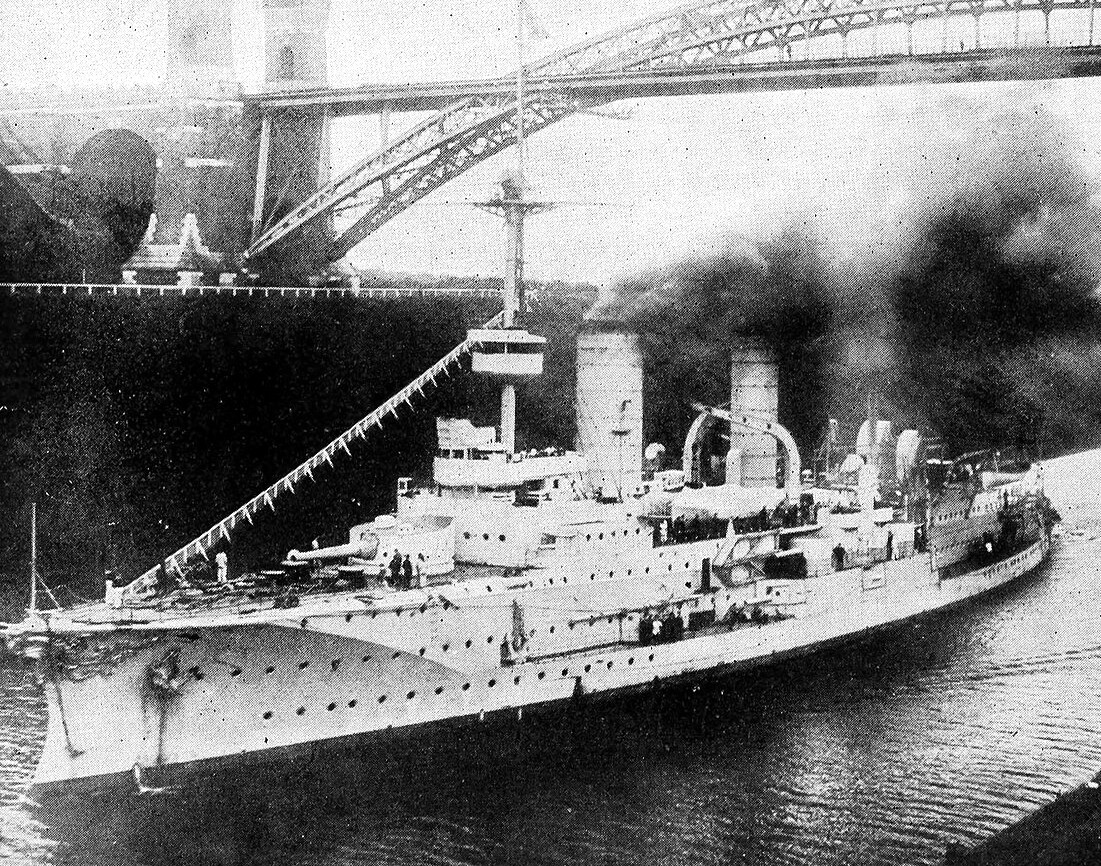
(Kaiserliche Marine Photo)
SMS Roon, passing under the Levensau Bridge of the Kiel Canal, c1910.
(Bundesarchiv, DVM 10 Bild-23-61-82 / CC-BY-SA 3.0)
One of the two Roon class cruisers, 1908.
SMS Yorck
(Arthur Renard Photo, c1910)
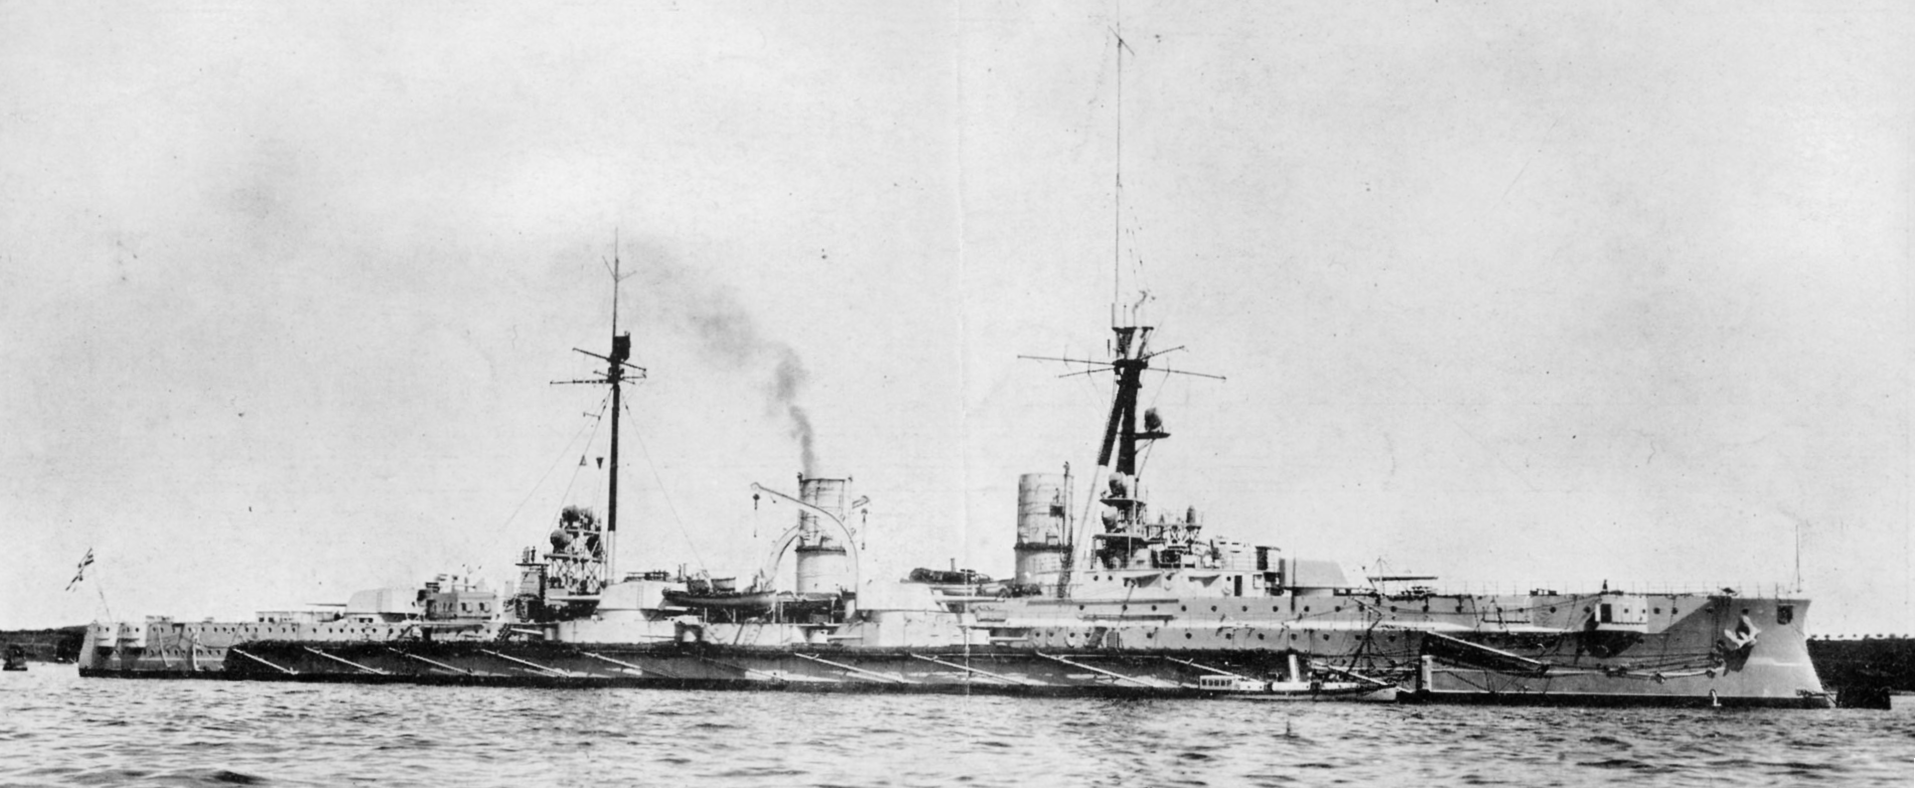
SMS Yorck (“His Majesty’s Ship Yorck”) was the second and final ship of the Roon class of armored cruisers built for the German Kaiserliche Marine (Imperial Navy) as part of a major naval expansion program aimed at strengthening the fleet. Yorck was named for Ludwig Yorck von Wartenburg, a Prussian field marshal. She was laid down in April 1903 at the Blohm & Voss shipyard in Hamburg, launched in May 1904, and commissioned in November 1905. The ship was armed with a main battery of four 21 cm (8.3 in) guns and had a top speed of 20.4 knots (37.8 km/h; 23.5 mph). Like many of the late armored cruisers, Yorck was quickly rendered obsolescent by the advent of the battlecruiser; as a result, her peacetime career was limited.
Yorck spent the first seven years of her career in I Scouting Group, the reconnaissance force for the Heimatflotte (Home Fleet), initially as the group flagship. She made several cruises in the Atlantic Ocean during this period. Yorck was involved in several accidents, including an explosion aboard the ship in 1911 and a collision with a torpedo boat in 1913. In May 1913, she was decommissioned and placed in reserve until the outbreak of World War I in July 1914. She was then mobilized and assigned to III Scouting Group. On 3 November, she formed part of the screen for the High Seas Fleet as it sailed to support a German raid on Yarmouth; on the return of the fleet to Wilhelmshaven, the ships encountered heavy fog and anchored in the Schillig Roads to await better visibility. Believing the fog to have cleared sufficiently, the ship’s commander ordered Yorck to get underway in the early hours of 4 November. She entered a German minefield in the haze, struck two mines, and sank with heavy loss of life. The wreck was dismantled progressively between the 1920s and 1980s to reduce the navigational hazard it posed. (Wikipedia)
(Kaiserliche Marine Photo)
SMS Yorck underway, c1914.
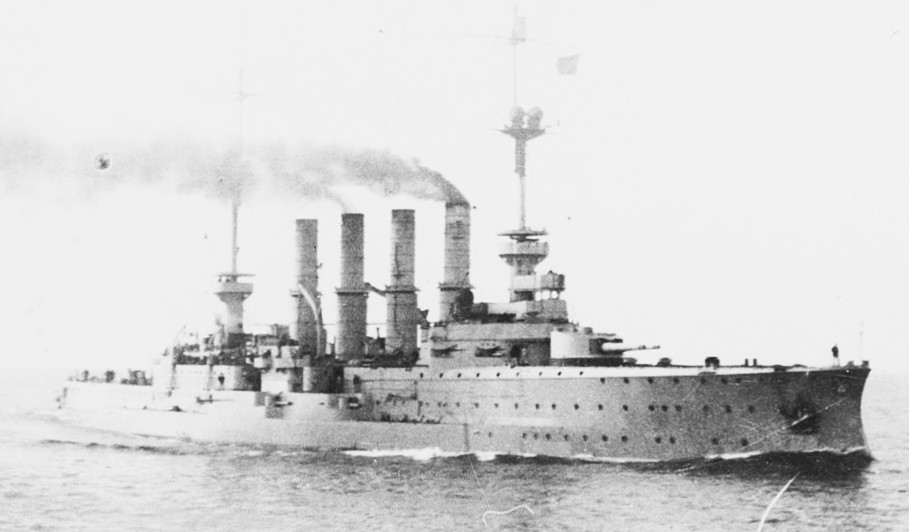
SMS Scharnhorst
(Arthur Renard Photo, c1907)
SMS Scharnhorst was an armoured cruiser of the Imperial German Navy, built at the Blohm & Voss shipyard in Hamburg, Germany. She was the lead ship of her class, which included SMS Gneisenau. Scharnhorst and her sister were enlarged versions of the preceding Roon class; they were equipped with a greater number of main guns and were capable of a higher top speed. The ship was named after the Prussian military reformer General Gerhard von Scharnhorst and commissioned into service on 24 October 1907.
Scharnhorst served briefly with the High Seas Fleet in Germany in 1908, though most of this time was spent conducting sea trials. She was assigned to the East Asia Squadron based in Qingdao, China, in 1909. After arriving, she replaced the cruiser Fürst Bismarck as the squadron flagship, a position she would hold for the rest of her career. Over the next five years, she went on several tours of various Asian ports to show the flag for Germany. She frequently carried the squadron commanders to meet Asian heads of state and was present in Japan for the coronation of the Taishō Emperor in 1912.
After the outbreak of the First World War in August 1914, Scharnhorst and Gneisenau, accompanied by three light cruisers and several colliers, sailed across the Pacific Ocean to the southern coast of South America. On 1 November 1914, Scharnhorst and the rest of the East Asia Squadron encountered and overpowered a British squadron at the Battle of Coronel. The defeat prompted the British Admiralty to dispatch two battlecruisers to hunt down and destroy the German squadron, which they accomplished at the Battle of the Falkland Islands on 8 December 1914. The discovery of the wreck was announced in December 2019 by Mensun Bound. (Wikipedia)
(Kaiserliche Marine Photo)
SMS Scharnhorst, 1908.
First World War
When the First World War broke out, the East Asia Squadron consisted of Scharnhorst, Gneisenau, Emden, Nürnberg, and Leipzig. At the time, Nürnberg was returning from the west coast of the United States, where Leipzig had just replaced her, and Emden was still in Qingdao. On 6 August 1914, Scharnhorst, Gneisenau, the supply ship Titania, and the Japanese collier Fukoku Maru were still in Ponape. Spee had issued orders to recall the light cruisers, which had been dispersed on cruises around the Pacific. Nürnberg joined Spee that day, after which Spee moved his ships to Pagan Island in the Northern Mariana Islands, a German possession in the central Pacific. Spee left for Pagan in the night, without Fukoku Maru, to avoid having the Japanese crew betray his movements.
All available colliers, supply ships, and passenger liners were ordered to meet the East Asia Squadron in Pagan[24] and Emden joined the squadron there on 12 August. The auxiliary cruiser Prinz Eitel Friedrich joined Spee’s ships there as well. On 13 August, Commodore Karl von Müller, captain of the Emden, persuaded Spee to detach his ship as a commerce raider. The four cruisers, accompanied by Prinz Eitel Friedrich and several colliers, then departed Pagan on 15 August, bound for Chile. While en route to Enewetak Atoll in the Marshall Islands the next morning, Emden left the formation with one of the colliers. The remaining ships again coaled after their arrival in Enewetak on 20 August.
To keep the German high command informed, on 8 September Spee detached Nürnberg to Honolulu to send word through neutral countries. Nürnberg returned with news of the Allied capture of German Samoa, which had taken place on 29 August. Scharnhorst and Gneisenau sailed to Apia to investigate the situation. Spee had hoped to catch a British or Australian warship by surprise, but upon his arrival on 14 September, he found no warships in the harbor.[28] On 22 September, Scharnhorst and the rest of the East Asia Squadron arrived at the French colony of Papeete. The Germans attacked the colony, and in the ensuing Battle of Papeete, they sank the French gunboat Zélée. The ships came under fire from French shore batteries but were undamaged. Fear of mines in the harbor prevented Spee from entering the harbor to seize the coal, which the French had set on fire.
By 12 October, Scharnhorst and the rest of the squadron had reached Easter Island. There they were joined by Dresden and Leipzig, which had sailed from American waters, on 12 and 14 October, respectively. Leipzig also brought three more colliers with her. After a week in the area, the ships departed for mainland Chile. On the evening of 26 October, Scharnhorst and the rest of the squadron steamed out of Mas a Fuera, Chile and headed eastward, arriving in Valparaíso on 30 October. On 1 November, Spee learned from Prinz Eitel Friedrich that the British light cruiser HMS Glasgow had been anchored in Coronel the previous day, so he turned towards the port to try to catch her alone.
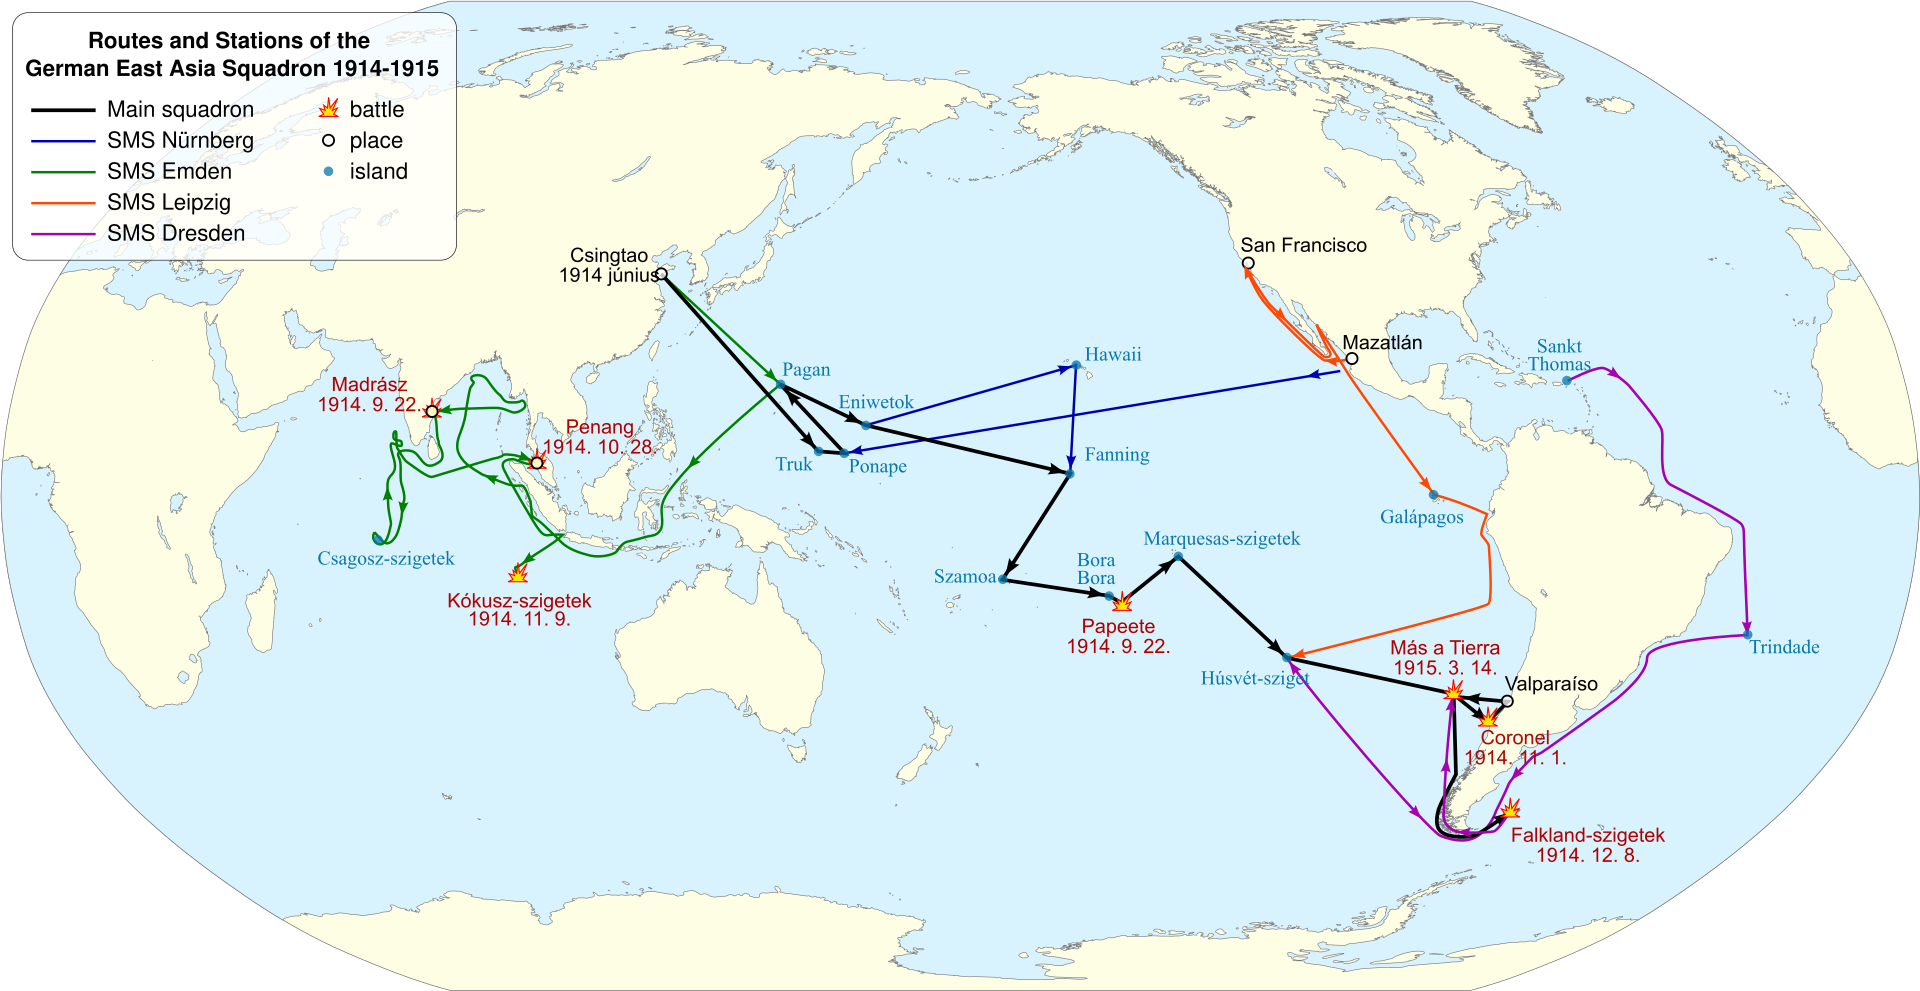
Map showing the route of the East Asia Squadron.
Battle of Coronel
The British and German fleets converged from the south and north, respectively. Two British ships split off to escape.

Ship movements during the Battle of Coronel. British ships are shown in red; German ships are shown in blue.
Battle of Coronel
The British had scant resources to oppose the German squadron off the coast of South America. Rear Admiral Christopher Cradock commanded the 4th Cruiser Squadron, which consisted of the armored cruisers HMS Good Hope and Monmouth, Glasgow, and the converted armed merchant cruiser Otranto. The squadron was reinforced by the elderly pre-dreadnought battleship Canopus and the armored cruiser Defence. The latter, however, did not arrive until after the Battle of Coronel. Canopus was left behind by Cradock, who probably felt her slow speed would prevent him from bringing the German ships to battle.
The East Asia Squadron arrived off Coronel on the afternoon of 1 November; to Spee’s surprise, he encountered Good Hope, Monmouth, and Otranto in addition to Glasgow. Canopus was still some 300 nmi (560 km; 350 mi) behind, with the British colliers.[35] At 16:17, Glasgow spotted the German ships. Cradock formed a line of battle with Good Hope in the lead, followed by Monmouth, Glasgow, and Otranto in the rear. Spee decided to hold off engaging until the sun had set more, at which point the British ships would be silhouetted by the sun, while his own ships would be obscured against the coast behind them. Cradock realized the uselessness of Otranto in the line of battle and detached her.
By 18:07, the distance between the two squadrons had fallen to 13,500 m (44,300 ft) and Spee ordered his ships to open fire thirty minutes later; each ship engaged their opposite in the British line.[38] Scharnhorst engaged Good Hope and hit her on the third salvo, striking between her forward gun turret and her conning tower and starting a major fire. Once the German gunners found the range, they began firing rapidly, with one salvo of high-explosive shells every fifteen seconds. Oberleutnant zur See (Lieutenant at Sea) Knoop, the spotting officer aboard Scharnhorst, reported that “Continual hits could be observed … in the midships Good Hope was hit repeatedly, with much fire resulting … the interior of this part of the ship was on fire, which could be seen through the portholes, shining brightly.”
In the meantime, Glasgow began to shoot at both Scharnhorst and Gneisenau, since she could no longer engage the German light cruisers. One of her 4-inch (102 mm) shells struck Scharnhorst in the forecastle but failed to explode. By 18:50, Monmouth had been badly damaged by Gneisenau and fell out of line; Gneisenau therefore joined Scharnhorst in battling Good Hope.[41] At the same time, Nürnberg closed to point-blank range of Monmouth and poured shells into her. At 19:23, Good Hope’s guns fell silent following two large explosions; the German gunners ceased fire shortly thereafter. Good Hope disappeared into the darkness. Spee ordered his light cruisers to close with his battered opponents and finish them off with torpedoes, while he took Scharnhorst and Gneisenau further south to get out of the way.
Glasgow was forced to abandon Monmouth after 19:20 when the German light cruisers approached, before fleeing south and meeting with Canopus. A squall prevented the Germans from discovering Monmouth, but she eventually capsized and sank at 20:18. More than 1,600 men were killed in the sinking of the two armored cruisers, including Cradock. German losses were negligible. However, the German ships had expended over 40 percent of their ammunition supply.[36] Scharnhorst was hit twice during the engagement, but both shells failed to explode.[44] The second hit passed through her third funnel and did not explode; she was struck by shell splinters that damaged her wireless antenna array. She suffered no casualties and the only German injuries were two slightly wounded men aboard Gneisenau.
Voyage to the Falklands
(Die Grosse Zeit Photo)
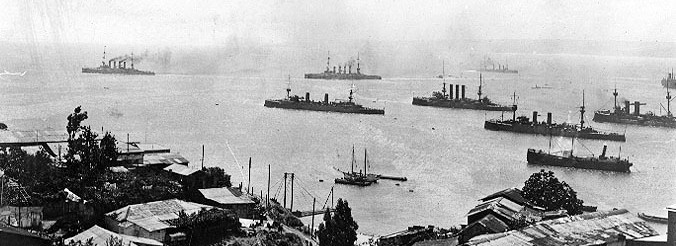
A group of large warships steaming slowly away from the city. The German squadron leaving Valparaíso on 3 November after the battle, Scharnhorst and Gneisenau in the lead and Nürnberg following. In the middle distance are a group of Chilean warships.
After the battle, Spee took his ships north to Valparaiso. Since Chile was neutral, only three ships could enter the port at a time; Spee took Scharnhorst, Gneisenau, and Nürnberg in first on the morning of 3 November, leaving Dresden and Leipzig with the colliers at Mas a Fuera. In Valparaiso, Spee’s ships could take on coal while he conferred with the Admiralty Staff in Germany to determine the strength of remaining British forces in the region. The ships remained in the port for only 24 hours, in accordance with the neutrality restrictions, and arrived at Mas a Fuera on 6 November, where they took on more coal from captured British and French steamers. On 10 November, Dresden and Leipzig were detached for a stop in Valparaiso, and five days later, Spee took the rest of the squadron south to St. Quentin Bay in the Gulf of Penas. On 18 November, Dresden and Leipzig met Spee while en route and the squadron reached St. Quentin Bay three days later. There, they took on more coal, since the voyage around Cape Horn would be a long one and it was unclear when they would have another opportunity to coal.
Once word of the defeat reached London, the Royal Navy set to organizing a force to hunt down and destroy the East Asia Squadron. To this end, the powerful battlecruisers Invincible and Inflexible were detached from the Grand Fleet and placed under the command of Vice Admiral Doveton Sturdee. The two ships left Devonport on 10 November and while en route to the Falkland Islands, they were joined by the armored cruisers Carnarvon, Kent, and Cornwall, the light cruisers Bristol and Glasgow, and the armed merchant cruiser Macedonia. The force of eight ships reached the Falklands by 7 December, where they immediately coaled.
In the meantime, Spee’s ships departed St. Quentin Bay on 26 November and rounded Cape Horn on 2 December. They captured the Canadian barque Drummuir, which had a cargo of 2,500 t (2,500 long tons) of good-quality Cardiff coal. Leipzig took the ship under tow and the following day the ships stopped off Picton Island. The crews transferred the coal from Drummuir to the squadron’s colliers. On the morning of 6 December, Spee held a conference with the ship commanders aboard Scharnhorst to determine their next course of action. The Germans had received numerous fragmentary and contradictory reports of British reinforcements in the region; Spee and two other captains favored an attack on the Falklands, while three other commanders argued that it would be better to bypass the islands and attack British shipping off Argentina. Spee’s opinion carried the day and the squadron departed for the Falklands at 12:00.
Battle of the Falkland Islands
Gneisenau and Nürnberg were delegated for the attack; they approached the Falklands the following morning (8 December), with the intention of destroying the wireless transmitter there. Observers aboard Gneisenau spotted smoke rising from Port Stanley, but assumed it was the British burning their coal stocks to prevent the Germans from seizing them.[50] As they closed on the harbor, 30.5 cm (12 in) shells from Canopus, which had been beached as a guard ship, began to fall around the German ships, which prompted Spee to break off the attack. The Germans took a southeasterly course at 22 kn (41 km/h; 25 mph) after having reformed by 10:45. Scharnhorst was the center ship, with Gneisenau and Nürnberg ahead and Dresden and Leipzig astern.[52][53] The fast battlecruisers quickly got up steam and sailed out of the harbor to pursue the slower East Asia Squadron.
By 13:20, the British ships had caught up with Scharnhorst and the other cruisers and began firing at a range of 14 km (8.7 mi). Spee realized his armoured cruisers could not escape the much faster battlecruisers and ordered the three light cruisers to attempt to break away while he turned about and allowed the British battlecruisers to engage the outgunned Scharnhorst and Gneisenau. Meanwhile, Sturdee detached his cruisers to pursue the German light cruisers. Invincible opened fire at Scharnhorst while Inflexible attacked Gneisenau and Spee ordered his two armored cruisers to similarly engage their opposites. Spee had taken the lee position; the wind kept his ships swept of smoke, which improved visibility for his gunners. This forced Sturdee into the windward position and its corresponding worse visibility. Scharnhorst straddled Invincible with her third salvo and quickly scored two hits on the British battlecruiser. The German flagship was not hit during this phase of the battle.
Sturdee attempted to widen the distance by turning two points to the north to prevent Spee from closing to within the range of his numerous secondary guns. Spee counteracted this maneuver by turning rapidly to the south, which forced Sturdee to turn south as well to keep within range. This allowed Scharnhorst and Gneisenau to turn back north and get close enough to engage with their secondary 15 cm guns. Their shooting was so accurate that it forced the British to haul away a second time. After resuming the battle, the British gunfire became more accurate; Scharnhorst was hit several times and fires broke out. The pace of her gunfire started to slacken, though she continued to score hits on Invincible. Sturdee then turned to port in an attempt to take the leeward position, but Spee countered the turn to retain his favorable position; the maneuvering did, however, reverse the order of the ships, so Scharnhorst now engaged Inflexible.
By this stage of the battle, Scharnhorst had a slight list to port and was about a meter lower in the water. Her third funnel had been shot away. Gneisenau was briefly obscured by smoke, which led both battlecruisers to target Scharnhorst. By 16:00, Spee ordered Gneisenau to attempt to escape while he reversed course and attempted to launch torpedoes at his pursuers. The port list had increased significantly by this point and she was well down by the bow, with only 2 meters (6 ft 7 in) of freeboard. At 16:17, the ship finally capsized to port and sank; the British, their attention now focused on Gneisenau, made no attempt to rescue the crew. All 860 officers and men on board, including Spee, went down with the ship. Gneisenau, Leipzig, and Nürnberg were also sunk. Only Dresden managed to escape, but she was eventually tracked to the Juan Fernandez Islands and sunk. The complete destruction of the squadron killed about 2,200 German sailors and officers, including two of Spee’s sons.
In mid-1915, a coastal steamer found the body of a German sailor off the coast of Brazil. The sailor had a watertight cartridge case from a 21 cm shell attached; inside was one of the Reichskriegsflaggen (Imperial war flags) flown aboard Scharnhorst. The sailor was buried in Brazil and the flag was eventually returned to Germany, where it was placed on display at the Museum für Meereskunde (Marine Science) in Berlin, though it was lost during the Second World War. In the mid-1930s, the new German navy, the Kriegsmarine, built a battleship named for Scharnhorst. At the launching of the new Scharnhorst in October 1936, the widow of the earlier ship’s captain was present.
An expedition led by the marine archaeologist Mensun Bound searching for the ships of Spee’s squadron began in 2014, but had no success. Bound returned for another attempt in 2019 with the research vessel Seabed Constructor, and on 5 December he announced he had located the wreck of Scharnhorst. The vessel lies upright at a depth of about 1,610 m (5,280 ft), some 98 nmi (181 km; 113 mi) southeast of the Falklands. Most of the superstructure has been destroyed or lies around the wreck, but the greater part of the hull is still intact. (Wikipedia)
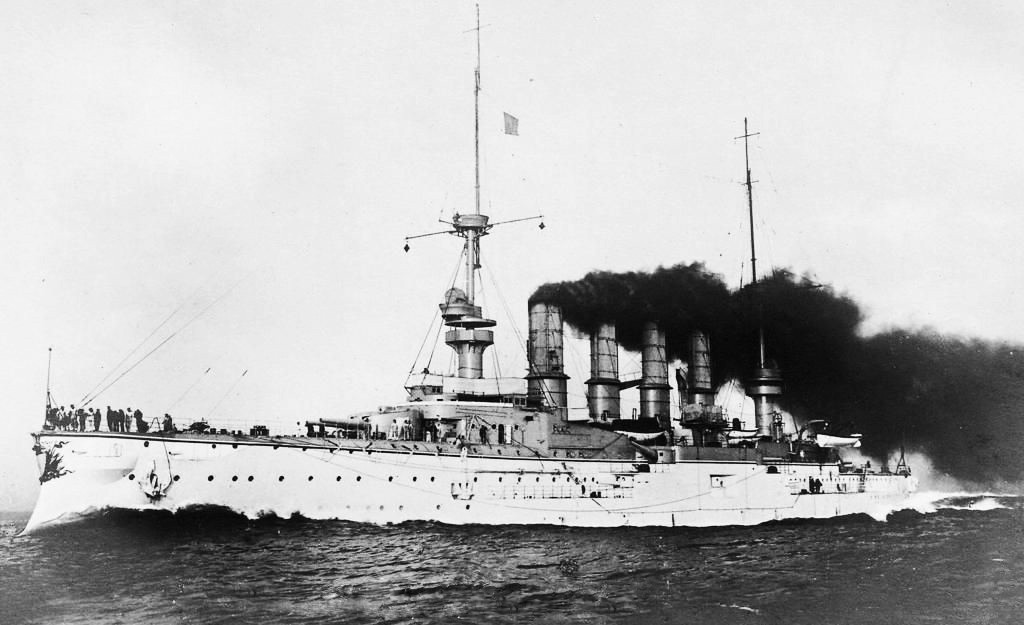
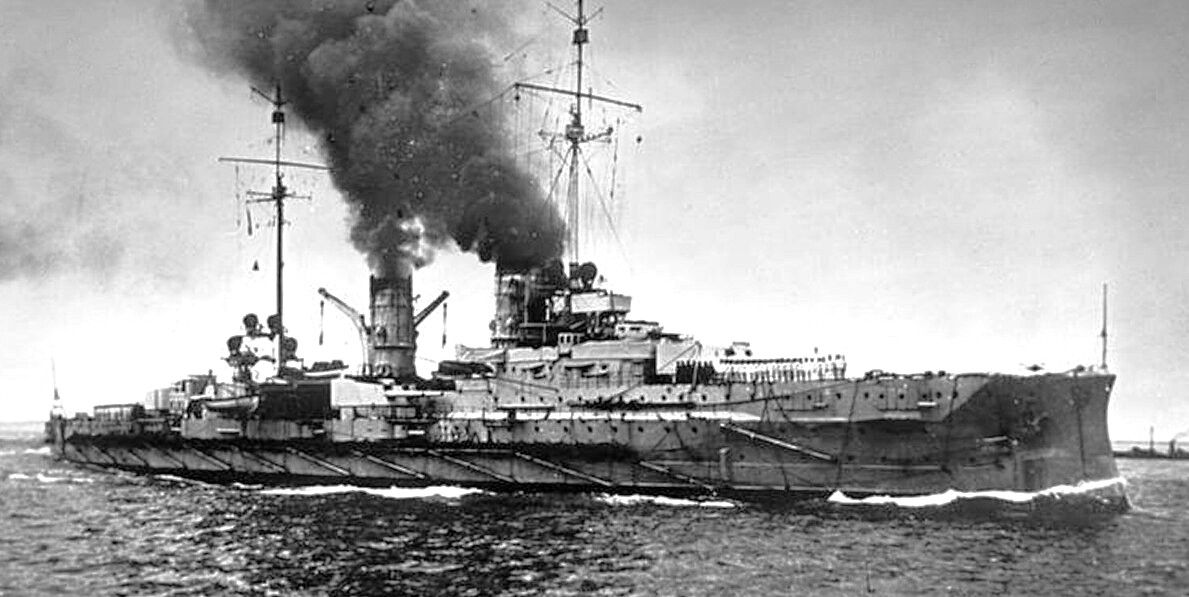
SMS Gneisenau
(Dutch magazine De Prins Photo, 14 Nov 1914)
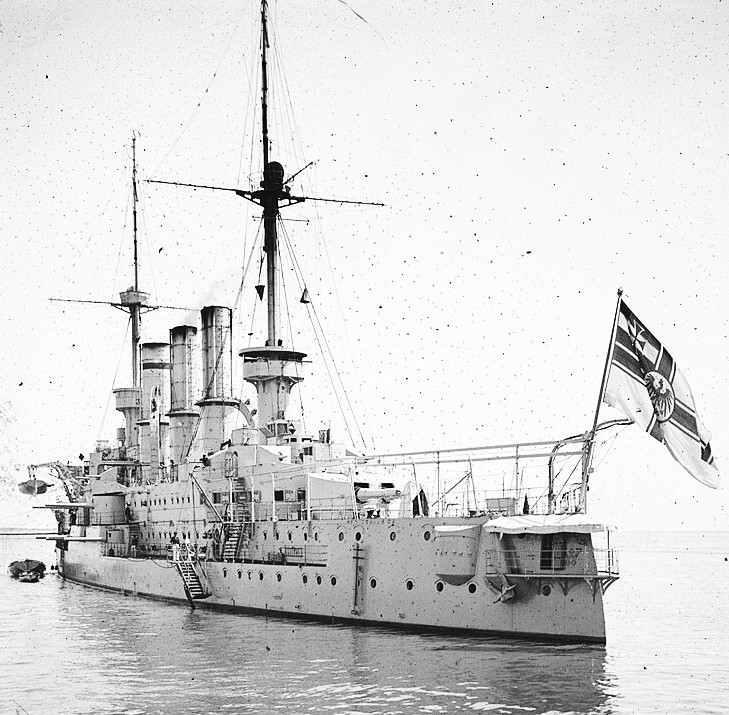
SMS Gneisenau was an armoured cruiser of the German Kaiserliche Marine (Imperial Navy), part of the two-ship Scharnhorst class. Named for the earlier screw corvette of the same name, the ship was laid down in June 1904 at the AG Weser shipyard in Bremen, launched in June 1906, and commissioned in March 1908. She was armed with a main battery of eight 21 cm (8.3 in) guns, a significant increase in firepower over earlier German armored cruisers, and she had a top speed of 22.5 knots (42 km/h; 26 mph). Gneisenau initially served with the German fleet in I Scouting Group, though her service there was limited owing to the British development of the battlecruiser by 1909, which the less powerful armored cruisers could not effectively combat.
Accordingly, Gneisenau was assigned to the German East Asia Squadron, where she joined her sister ship Scharnhorst. The two cruisers formed the core of the squadron, which included several light cruisers. Over the next four years, Gneisenau patrolled Germany’s colonial possessions in Asia and the Pacific Ocean. She also toured foreign ports to show the flag and monitored events in China during the Xinhai Revolution in 1911. Following the outbreak of World War I in July 1914, the East Asia Squadron, under the command of Vice Admiral Maximilian von Spee, crossed the Pacific to the western coast of South America, stopping for Gneisenau and Scharnhorst to attack French Polynesia in the Bombardment of Papeete in September.
After arriving off the coast of Chile, the East Asia Squadron encountered and defeated a British squadron at the Battle of Coronel; during the action, Gneisenau disabled the British armored cruiser HMS Monmouth, which was then sunk by the German light cruiser Nürnberg. The defeat prompted the British Admiralty to detach two battlecruisers to hunt down and destroy Spee’s squadron, which they accomplished at the Battle of the Falkland Islands on 8 December 1914. Gneisenau was sunk with heavy loss of life, though 187 of her crew were rescued by the British. (Wikipedia)

(Kaiserliche Marine Photo)
SMS Gneisenau.
(Kaiserliche Marine Photo)
SMS Gneisenau.
SMS Blücher
(Bundesarchiv, DVM 10 Bild-23-61-11 / CC-BY-SA 3.0, 1912)
SMS Blücher was the last armoured cruiser built for the German Kaiserliche Marine (Imperial Navy) beginning in 1907. She was designed in response to the latest British armored cruisers, but the British had already begun work on the Invincible-class battlecruisers, which marked a significant increase in firepower over earlier armored cruisers. Blücher was armed with a main battery of twelve 21 cm (8.3 in) guns, compared to the eight 30.5 cm (12 in) guns of the British ships. Blücher entered service after the Invincibles were commissioned, and as a result, was obsolescent at the start of her career.
Blücher was built at the Kaiserliche Werft shipyard in Kiel between 1907 and 1909, and commissioned on 1 October 1909. The ship initially served in the I Scouting Group for most of her career after entering service in 1910, but in late 1911 was transferred to serve as a gunnery training ship, where she remained until the outbreak of World War I in August 1914. She then returned to I Scouting Group, operating primarily in the North Sea against British forces. She took part in the operation to bombard Yarmouth and the raid on Scarborough, Hartlepool and Whitby in November and December 1914, respectively.
At the Battle of Dogger Bank on 24 January 1915, Blücher was slowed significantly after being hit by gunfire from the British battlecruiser squadron under the command of Vice Admiral David Beatty. Rear Admiral Franz von Hipper, the commander of the German squadron, decided to abandon Blücher to the pursuing enemy ships in order to save his more valuable battlecruisers. Under heavy fire from the British ships, she was sunk, and British destroyers began recovering the survivors. However, the destroyers withdrew when a German zeppelin began bombing them, mistaking the sinking Blücher for a British battlecruiser. The number of casualties is unknown, with figures ranging from 747 to around 1,000. Blücher was the only warship lost during the engagement. (Wikipedia)
(Kaiserliche Marine Photo)
SMS Blücher.
(Kaiserliche Marine Photo)
SMS Blücher. Built by Kaiserliche Werft Kiel, she was commissioned on October 1st 1909. At a top speed of 25.4 knots the 15,592 long ton (normal load) Blücher was armed with 12 × 21 cm (8.3 in) SK L/45 guns, 8 × 15 cm (5.9 in) SK L/45 guns, 16 × 8.8 cm (3.5 in) SK L/45 guns, 4 × 45 cm (17.7 in) torpedo tubes. SMS Blücher was named after the Prussian Field Marshal Gebhard von Blücher, the commander of Prussian forces at the Battle of Waterloo in 1815.
(Library of Congress Photo)
SMS Blücher underway, c1910.
(Kaiserliche Marine Photo)
SMS Blücher, c1914, during the First World War as evidenced by the anti-torpedo nets, which were not fitted during peacetime.
Battle of Dogger Bank (1915)
In early January 1915 the German naval command found out that British ships were conducting reconnaissance in the Dogger Bank area. Admiral Ingenohl was initially reluctant to attempt to destroy these forces, because the I Scouting Group was temporarily weakened while Von der Tann was in drydock for periodic maintenance. KAdm Richard Eckermann—the Chief of Staff of the High Seas Fleet—insisted on the operation, and so Ingenohl relented and ordered Hipper to take his battlecruisers to the Dogger Bank.
On 23 January, Hipper sortied, with Seydlitz in the lead, followed by Moltke, Derfflinger, and Blücher, along with the light cruisers Graudenz, Rostock, Stralsund, and Kolberg and 19 torpedo boats from V Flotilla and II and XVIII Half-Flotillas. Graudenz and Stralsund were assigned to the forward screen, while Kolberg and Rostock were assigned to the starboard and port, respectively. Each light cruiser had a half-flotilla of torpedo boats attached.
Again, interception and decryption of German wireless signals played an important role. Although they were unaware of the exact plans, the cryptographers of Room 40 were able to deduce that Hipper would be conducting an operation in the Dogger Bank area. To counter it, Beatty’s 1st Battlecruiser Squadron, Rear Admiral Gordon Moore’s 2nd Battlecruiser Squadron and Commodore William Goodenough’s 2nd Light Cruiser Squadron were to rendezvous with Commodore Reginald Tyrwhitt’s Harwich Force at 08:00 on 24 January, approximately 30 nmi (56 km; 35 mi) north of the Dogger Bank.
At 08:14, Kolberg spotted the light cruiser Aurora and several destroyers from the Harwich Force.[33] Aurora challenged Kolberg with a searchlight, at which point Kolberg attacked Aurora and scored two hits. Aurora returned fire and scored two hits on Kolberg in retaliation. Hipper immediately turned his battlecruisers towards the gunfire, when, almost simultaneously, Stralsund spotted a large amount of smoke to the northwest of her position. This was identified as a number of large British warships steaming toward Hipper’s ships. Hipper later remarked:
“The presence of such a large force indicated the proximity of further sections of the British Fleet, especially as wireless intercepts revealed the approach of 2nd Battlecruiser Squadron … They were also reported by Blücher at the rear of the German line, which had opened fire on a light cruiser and several destroyers coming up from astern … The battlecruisers under my command found themselves, in view of the prevailing [East-North-East] wind, in the windward position and so in an unfavourable situation from the outset …”
Hipper turned south to flee, but was limited to 23 kn (43 km/h; 26 mph), which was Blücher’s maximum speed at the time.[f] The pursuing British battlecruisers were steaming at 27 kn (50 km/h; 31 mph), and quickly caught up to the German ships. At 09:52, Lion opened fire on Blücher from a range of approximately 20,000 yards (18,000 m); shortly after, Princess Royal and Tiger began firing as well. At 10:09, the British guns made their first hit on Blücher. Two minutes later, the German ships began returning fire, primarily concentrating on Lion, from a range of 18,000 yd (16,000 m). At 10:28, Lion was struck on the waterline, which tore a hole in the side of the ship and flooded a coal bunker. At around this time, Blücher scored a hit with a 21 cm shell on Lion’s forward turret. The shell failed to penetrate the armor, but had concussion effect and temporarily disabled the left gun. At 10:30, New Zealand—the fourth ship in Beatty’s line—came within range of Blücher and opened fire. By 10:35, the range had closed to 17,500 yd (16,000 m), at which point the entire German line was within the effective range of the British ships. Beatty ordered his battlecruisers to engage their German counterparts.
By 11:00, Blücher had been severely damaged after being pounded by numerous heavy shells from the British battlecruisers. However, the three leading German battlecruisers, Seydlitz, Derfflinger, and Moltke, had concentrated their fire on Lion and scored several hits; two of her three dynamos were disabled and the port side engine room had been flooded. At 11:48, Indomitable arrived on the scene, and was directed by Beatty to destroy the battered Blücher, which was already on fire and listing heavily to port. One of the ship’s survivors recounted the destruction that was being wrought:
“The shells … bore their way even to the stokehold. The coal in the bunkers was set on fire. Since the bunkers were half empty, the fire burned merrily. In the engine room a shell licked up the oil and sprayed it around in flames of blue and green … The terrific air pressure resulting from [an] explosion in a confined space … roar[ed] through every opening and [tore] its way through every weak spot … Men were picked up by that terrific air pressure and tossed to a horrible death among the machinery.”
The British attack was interrupted due to reports of U-boats ahead of the British ships. Beatty quickly ordered evasive maneuvers, which allowed the German ships to increase the distance from their pursuers. At this time, Lion’s last operational dynamo failed, which reduced her speed to 15 kn (28 km/h; 17 mph). Beatty, in the stricken Lion, ordered the remaining battlecruisers to “Engage the enemy’s rear”, but signal confusion caused the ships to target Blücher alone. She continued to resist stubbornly; Blücher repulsed attacks by the four cruisers of the 1st Light Cruiser Squadron and four destroyers. However, the 1st Light Cruiser Squadron flagship, Aurora, hit Blücher twice with torpedoes. By this time, every main battery gun turret except the rear mount had been silenced. A volley of seven more torpedoes was launched at point-blank range; these hits caused the ship to capsize at 13:13. Blücher remained afloat, upside down, for several minutes before sinking.[40] In the course of the engagement, Blücher had been hit by 70–100 large-caliber shells and several torpedoes.
As the ship was sinking, British destroyers steamed towards her in an attempt to rescue survivors from the water. However, the German zeppelin L5 mistook the sinking Blücher for a British battlecruiser, and tried to bomb the destroyers, which withdrew. Figures vary on the number of casualties; Paul Schmalenbach reported 6 officers of a total of 29 and 275 enlisted men of a complement of 999 were pulled from the water, for a total of 747 men killed. The official German sources examined by Erich Gröner stated that 792 men died when Blücher sank, while James Goldrick referred to British documents, which reported only 234 men survived from a crew of at least 1,200. The historians Hans Hildebrand, Albert Röhr, and Hans-Otto Steinmetz concur with Gröner’s total of 792 deaths, but state that there were 260 survivors. Erdmann was among those who had been rescued, though he later died of pneumonia while in British captivity. A further twenty men would also die as prisoners of war.
The concentration on Blücher allowed Moltke, Seydlitz, and Derfflinger to escape. Hipper had originally intended to use his three battlecruisers to turn about and flank the British ships, in order to relieve the battered Blücher, but when he learned of the severe damage to his flagship, he decided to abandon the armored cruiser. Hipper later recounted his decision:
“In order to help the Blücher it was decided to try for a flanking move … But as I was informed that in my flagship turrets C and D were out of action, we were full of water aft, and that she had only 200 rounds of heavy shell left, I dismissed any further thought of supporting the Blücher. Any such course, now that no intervention from our Main Fleet was to be counted on, was likely to lead to further heavy losses. The support of the Blücher by the flanking move would have brought my formation between the British battlecruisers and the battle squadrons which were probably behind.”
By the time Beatty regained control over his ships, having boarded Princess Royal, the German ships had too great a lead for the British to catch them; at 13:50, he broke off the chase. Kaiser Wilhelm II was enraged by the destruction of Blücher and the near sinking of Seydlitz, and ordered the High Seas Fleet to remain in harbor. Eckermann was removed from his post and Ingenohl was forced to resign. He was replaced by Admiral Hugo von Pohl. Beyond the loss of the ship itself and the resulting command changes, the death of so many men negatively impacted the fleet, as Blücher was crewed by a large number of highly trained artillery specialists. (Wikipedia)
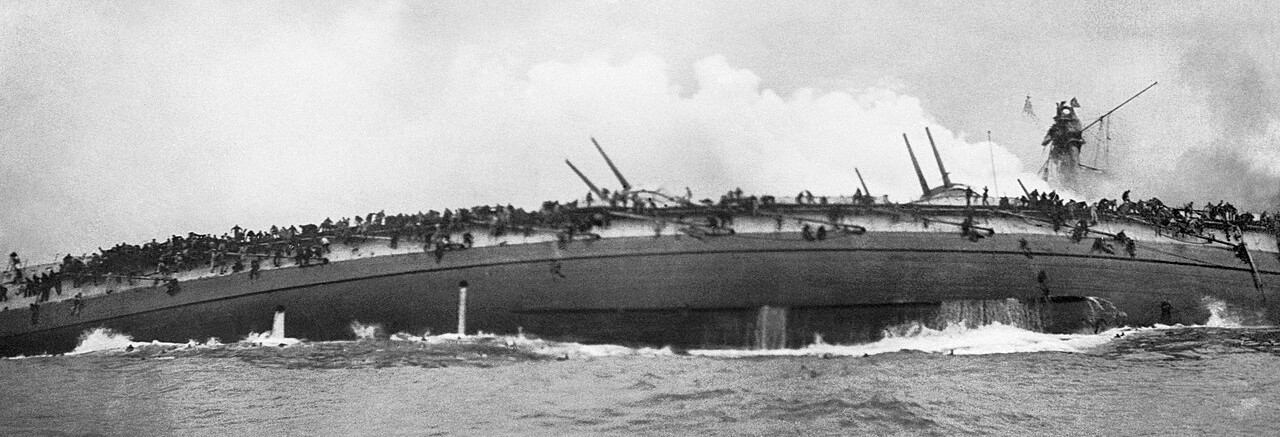
(International Film Service Photo)
SMS Blücher sinking after receiving multiple hits from British warships at the Battle of Dogger Bank on 25 January 1915. This photo was taken from the deck of the British cruiser HMS Arethusa.